
Shader 1: a sunset
Your first shader. You write in C# each part you already know, compile it with add and use the result.
This is the shader you will make in this chapter. It paints the whole screen with a gradient, from pink at the top to yellow at the bottom:

It is simple on purpose. What matters here is not the drawing, but that you write in C#, one by one, the five things you saw in How a shader is built. The four shaders that come next use exactly these same parts.
The plan#
How a shader is built ended with a list of five decisions. This is how each one is written in C#:
| What you decide | How it is written in C# | |
|---|---|---|
| 1 | What data each vertex carries (door A) | A struct, with [location] on each field. |
| 2 | What Vertex lets through to Fragment (door B) | Another struct. |
| 3 | What the Vertex function does | A method marked with [ShaderStage(Stage.Vertex)]. |
| 4 | What the Fragment function does | A method marked with [ShaderStage(Stage.Fragment)]. |
| 5 | Where the color goes (door C) | [return: location(0)] above the Fragment method. |
There is nothing else. A shader in C# is a few structs and a class with two methods.
The shape: a rectangle that covers the whole screen#
There we followed a triangle. Now we want to paint the entire screen, so the shape is going to be a rectangle that covers it from edge to edge: two triangles, four vertices.
What data does each vertex carry? Two things:
- The position, as always. The four corners of the screen:
(-1, 1),(1, 1),(-1, -1)and(1, -1). - A piece of data usually called
Uv, which is new.
What is Uv and what do I want it for?#
To make a gradient, each pixel needs to know whether it is at the top or at the bottom. But you already saw that a pixel knows nothing by itself: it only knows what reaches it through the spreading.
So we are going to send it exactly that. We give each vertex a pair of numbers that says which corner of the rectangle it is:
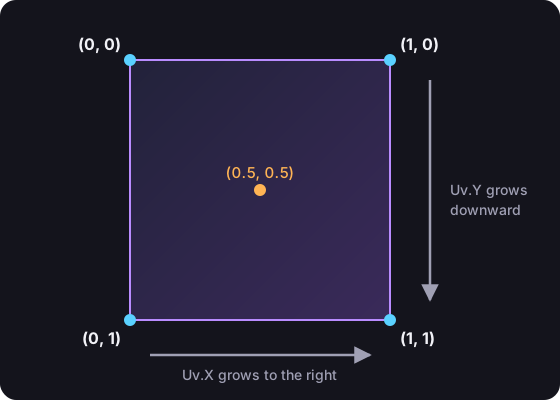
And the spreading does the rest. A pixel halfway between corner (0, 0) and corner (1, 0) receives (0.5, 0). One right in the center receives (0.5, 0.5). Each pixel ends up knowing where it is inside the rectangle, with two numbers from 0 to 1.
The name Uv is a custom: in graphics the letters "U" and "V" are used so they are not confused with the X and Y of the position. It means nothing more.
With that, the three doors of this shader look like this:
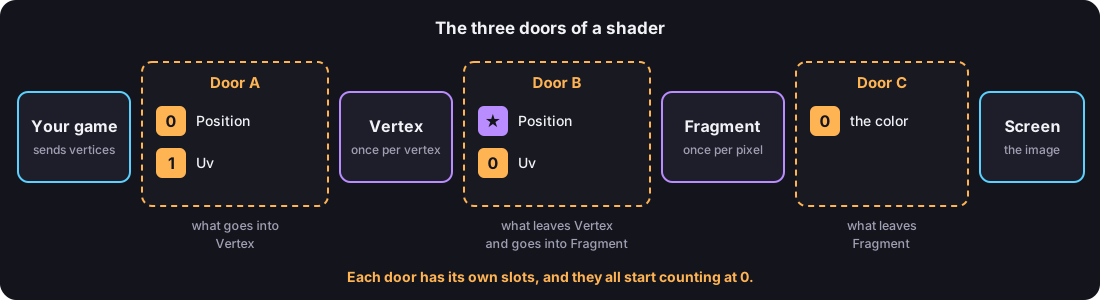
It is the same drawing of the three doors you already know, changing "color" for Uv. Keep it at hand, because each slot in that drawing is going to be a line of C#.
Vectors: numbers that go together#
Before writing the doors you are missing one tool. A position is two numbers. A color is four. In a shader you almost never work with a single number, and that is why there are three types that group float numbers:
| Type | How many float it has | Its fields | What it is almost always used for |
|---|---|---|---|
vec2 | 2 | X, Y | A position in 2D, or a Uv. |
vec3 | 3 | X, Y, Z | A position in 3D, or a color without opacity. |
vec4 | 4 | X, Y, Z, W | A color with opacity, or the final position. |
These types are called vectors. You do not need to know math to use them: think of them as a struct with two, three or four float.
When a vec4 holds a color, its fields are still called X, Y, Z and W, so you have to remember the order:
| Field | In a color it is |
|---|---|
X | the red |
Y | the green |
Z | the blue |
W | the opacity |
First file: a helper for creating vectors#
You are going to create vectors all the time, so it is worth having a short way to do it. Create the file Make.cs inside MyShaders:
using YotsubaShader.GlslSyntax.Types;

namespace MyShaders;

public static class Make
{
    public static vec2 Vec2(float x, float y)
    {
        vec2 v;
        v.X = x;
        v.Y = y;
        return v;
    }

    public static vec3 Vec3(float x, float y, float z)
    {
        vec3 v;
        v.X = x;
        v.Y = y;
        v.Z = z;
        return v;
    }

    public static vec4 Vec4(float x, float y, float z, float w)
    {
        vec4 v;
        v.X = x;
        v.Y = y;
        v.Z = z;
        v.W = w;
        return v;
    }
}The three functions do the same thing: they create an empty vector, fill its fields one by one and return it. Now, to have the color red, it is enough to write Make.Vec4(1f, 0f, 0f, 1f).
using YotsubaShader.GlslSyntax.Types;is wherevec2,vec3andvec4come from.- The
fin1fsays the number is afloat. Get used to always writing it: with a number that has decimals, like0.5, it is mandatory, because without it C# takes it as adoubleand it does not compile.
This already teaches you something important: from a shader you can call your own functions. Make.Vec4 is a plain ordinary C# method, and the compiler takes it to the GPU along with your shader.
Second file: doors A and B#
Now for the doors. Both go in a file called Screen.cs. You are going to write it in two parts.
Door A: what each vertex carries#
Create Screen.cs with this:
using YotsubaShader.GlslSyntax;
using YotsubaShader.GlslSyntax.Types;

namespace MyShaders;

public struct Corner
{
    [location(0)] public vec2 Position;
    [location(1)] public vec2 Uv;
}using YotsubaShader.HlslSyntax;
using YotsubaShader.GlslSyntax.Types;
namespace MyShaders;
public struct Corner
{
[TEXCOORD(0)] public vec2 Position;
[TEXCOORD(1)] public vec2 Uv;
}using YotsubaShader.MslSyntax;
using YotsubaShader.GlslSyntax.Types;
namespace MyShaders;
public struct Corner
{
[attribute(0)] public vec2 Position;
[attribute(1)] public vec2 Uv;
}using YotsubaShader.WgslSyntax;
using YotsubaShader.GlslSyntax.Types;
namespace MyShaders;
public struct Corner
{
[location(0)] public vec2 Position;
[location(1)] public vec2 Uv;
}using YotsubaShader.SpirvSyntax;
using YotsubaShader.GlslSyntax.Types;
namespace MyShaders;
public struct Corner
{
[Location(0)] public vec2 Position;
[Location(1)] public vec2 Uv;
}This is door A, written in C#. Line by line:
public struct Corner: a vertex is a packet of data, and in C# a packet of data is astruct. I chose the nameCorner, because each vertex of our rectangle is one of its corners. You can call it whatever you want.[location(0)] public vec2 Position;: "in slot 0 of this door twofloattravel, and I am going to call themPosition".[location(1)] public vec2 Uv;: "in slot 1 another twofloattravel, and I am going to call themUv".
[location] comes from using YotsubaShader.GlslSyntax;, that is why that using is at the top.
Compare it with the drawing of the doors: at door A there is a slot 0 with Position and a slot 1 with Uv. It is exactly what you just wrote.
Three questions it is normal to ask here:
Who fills those slots? Your game. When you get to your game engine you are going to write the four corners with their position and their Uv, and you are going to tell it that the position goes in slot 0 and the Uv in slot 1. Here, in the shader, you only declare what you expect to receive.
Do the names Position and Uv matter? Not to the GPU. It only sees the slot number and the type. The names are for you, so the code can be read.
What happens if I get the number wrong? The shader reads the wrong data. If you put Uv in slot 0 here, you would receive the position believing it is the Uv. No error comes up: the drawing simply comes out wrong. That is why it is worth being clear about what goes in each slot.
Door B: what Vertex lets through to Fragment#
Add the second struct below the first one. The complete file looks like this:
using YotsubaShader.GlslSyntax;
using YotsubaShader.GlslSyntax.Types;

namespace MyShaders;

public struct Corner
{
    [location(0)] public vec2 Position;
    [location(1)] public vec2 Uv;
}

public struct Pixel
{
    [gl_Position] public vec4 Position;
    [location(0)] public vec2 Uv;
}

public struct PixelIn
{
    [location(0)] public vec2 Uv;
}using YotsubaShader.HlslSyntax;
using YotsubaShader.GlslSyntax.Types;
namespace MyShaders;
public struct Corner
{
[TEXCOORD(0)] public vec2 Position;
[TEXCOORD(1)] public vec2 Uv;
}
public struct Pixel
{
[SV_Position] public vec4 Position;
[TEXCOORD(0)] public vec2 Uv;
}
public struct PixelIn
{
[TEXCOORD(0)] public vec2 Uv;
}using YotsubaShader.MslSyntax;
using YotsubaShader.GlslSyntax.Types;
namespace MyShaders;
public struct Corner
{
[attribute(0)] public vec2 Position;
[attribute(1)] public vec2 Uv;
}
public struct Pixel
{
[position] public vec4 Position;
[attribute(0)] public vec2 Uv;
}
public struct PixelIn
{
[attribute(0)] public vec2 Uv;
}using YotsubaShader.WgslSyntax;
using YotsubaShader.GlslSyntax.Types;
namespace MyShaders;
public struct Corner
{
[location(0)] public vec2 Position;
[location(1)] public vec2 Uv;
}
public struct Pixel
{
[builtin_position] public vec4 Position;
[location(0)] public vec2 Uv;
}
public struct PixelIn
{
[location(0)] public vec2 Uv;
}using YotsubaShader.SpirvSyntax;
using YotsubaShader.GlslSyntax.Types;
namespace MyShaders;
public struct Corner
{
[Location(0)] public vec2 Position;
[Location(1)] public vec2 Uv;
}
public struct Pixel
{
[BuiltIn_Position] public vec4 Position;
[Location(0)] public vec2 Uv;
}
public struct PixelIn
{
[Location(0)] public vec2 Uv;
}Pixel is door B as Vertex sees it. It has the two kinds of data that leave Vertex, the special one and yours:
[gl_Position] public vec4 Position;is the special data, the one with the star.[gl_Position]tells the GPU: "this is the final position of the vertex, keep it". That is why it has no number. And it is avec4because the final position has four numbers.[location(0)] public vec2 Uv;is data of yours: "in slot 0 of this door theUvtravels".
"Wait a moment: location(0) again?"#
Yes. And this is the moment to look at it carefully, because it is exactly the confusion I warned you about.
In Corner, slot 0 is the position. In Pixel, slot 0 is the Uv. They do not clash, because they are two different doors, and each door counts from 0 on its own:
| Slot 0 | Slot 1 | |
|---|---|---|
Corner (door A) | Position | Uv |
Pixel (door B) | Uv | none |
The Uv came in through slot 1 of door A and leaves through slot 0 of door B. Nothing wrong with that: the number is only valid inside its own door.
And why is the Uv in Pixel not slot 1, so it looks the same? You could put it in 1 and it would work. But at door B the position does not take a slot, so the first free one is 0. The normal thing is to number from 0 without leaving gaps.
Why is it called Pixel?#
Because it is what reaches each pixel. The Vertex function fills it once per vertex, the GPU spreads it, and the Fragment function receives it once per pixel, already blended.
Fragment does not receive the whole Pixel. The final position is for the GPU to place the triangle, and a Fragment function has no use for it (in GLSL, gl_Position does not even exist in that stage, and the compiler warns you if you try). That is why the file has a second struct, PixelIn, with only the data of yours: what Fragment receives.
The two sides of door B have to agree: the same location number and the same type. Here Uv is location(0) and vec2 in both. If one side said vec3, or slot 1, the shader would not compile.
Third file: the two functions#
Decisions 3, 4 and 5 are left: the two functions and door C. They go together in a class. First I show them to you separately, and then the complete file for you to copy.
The Vertex function#
[ShaderStage(Stage.Vertex)]
public Pixel Vertex(Corner corner)
{
    Pixel pixel;
    pixel.Position = Make.Vec4(corner.Position.X, corner.Position.Y, 0f, 1f);
    pixel.Uv = corner.Uv;
    return pixel;
}
Start with the first line and the signature, which already say almost everything:
[ShaderStage(Stage.Vertex)]is what turns this method into the Vertex stage. Without that attribute it would be just any method and the GPU would never call it.(Corner corner): what it receives. It is door A: one vertex, with itsPositionand itsUv. Remember it is a single one. The GPU calls the method four times, once per corner.public Pixel: what it returns. It is door B.- The name
Vertexis free. It could be calledPlaceCorner. What counts is the attribute.
And the body does the two jobs of the Vertex stage:
Job 1, say where the vertex goes:
pixel.Position = Make.Vec4(corner.Position.X, corner.Position.Y, 0f, 1f);Here we do not want to move anything, so the final position is the same one that arrived. The only thing that changes is that it arrived with two numbers and has to be handed over with four. That is why we take the X and the Y that arrived and fill in 0f and 1f, which are the depth and the perspective we talked about.
Job 2, let through what Fragment is going to need:
pixel.Uv = corner.Uv;We copy the Uv as is. If you did not, nothing would reach the Fragment function to tell where each pixel is.
Pixel pixel; at the start and return pixel; at the end are the same thing you did in Make.cs: declare the empty struct, fill its two fields and return it.
The Fragment function and door C#
[ShaderStage(Stage.Fragment)]
[return: location(0)]
public vec4 Fragment(PixelIn pixel)
{
    return Make.Vec4(1f, 0f, 0f, 1f);
}[ShaderStage(Stage.Fragment)]turns this method into the Fragment stage.(PixelIn pixel): what it receives. It is the other side of door B: only your data, without the position. But mind what you learned about the spreading: thispixelis none of the four thatVertexreturned. It is a mix of them, different for each pixel.public vec4: what it returns. A color, that is, four numbers.[return: location(0)]is door C: "the color I return goes to slot 0". And slot 0 of door C is the screen.
If you had never seen [return: ...], it is normal C#. Attributes go above what they describe: above a field, a method, a class. But what a method returns has no place of its own to put anything above, so C# lets you write return: in front to say "this attribute is not for the method, it is for what it returns".
For now the body does the simplest thing possible. It always returns Make.Vec4(1f, 0f, 0f, 1f), which is red: all the red, no green, no blue, and full opacity. It does not even use the pixel it receives. So the whole screen is going to be red.
The three zeros#
You have now written the three doors, and all three have a location(0). Now you can read them without getting confused:
| Where you wrote it | Which door it is | What travels in its slot 0 |
|---|---|---|
[location(0)] in Corner | A: from the game to Vertex | The position of the vertex. |
[location(0)] in Pixel and in PixelIn | B: from Vertex to Fragment | The Uv. |
[return: location(0)] on Fragment | C: from Fragment to the screen | The color of the pixel. |
Three zeros, three doors, three different things.
The complete file#
Create Gradient.cs with the two functions inside a class:
using YotsubaShader.GlslSyntax;
using YotsubaShader.GlslSyntax.Types;
using YotsubaShader.Language;

namespace MyShaders;

public class Gradient
{
    [ShaderStage(Stage.Vertex)]
    public Pixel Vertex(Corner corner)
    {
        Pixel pixel;
        pixel.Position = Make.Vec4(corner.Position.X, corner.Position.Y, 0f, 1f);
        pixel.Uv = corner.Uv;
        return pixel;
    }

    [ShaderStage(Stage.Fragment)]
    [return: location(0)]
    public vec4 Fragment(PixelIn pixel)
    {
        return Make.Vec4(1f, 0f, 0f, 1f);
    }
}using YotsubaShader.HlslSyntax;
using YotsubaShader.GlslSyntax.Types;
using YotsubaShader.Language;
namespace MyShaders;
public class Gradient
{
[ShaderStage(Stage.Vertex)]
public Pixel Vertex(Corner corner)
{
Pixel pixel;
pixel.Position = Make.Vec4(corner.Position.X, corner.Position.Y, 0f, 1f);
pixel.Uv = corner.Uv;
return pixel;
}
[ShaderStage(Stage.Fragment)]
[return: SV_Target]
public vec4 Fragment(PixelIn pixel)
{
return Make.Vec4(1f, 0f, 0f, 1f);
}
}using YotsubaShader.MslSyntax;
using YotsubaShader.GlslSyntax.Types;
using YotsubaShader.Language;
namespace MyShaders;
public class Gradient
{
[ShaderStage(Stage.Vertex)]
public Pixel Vertex(Corner corner)
{
Pixel pixel;
pixel.Position = Make.Vec4(corner.Position.X, corner.Position.Y, 0f, 1f);
pixel.Uv = corner.Uv;
return pixel;
}
[ShaderStage(Stage.Fragment)]
[return: color(0)]
public vec4 Fragment(PixelIn pixel)
{
return Make.Vec4(1f, 0f, 0f, 1f);
}
}using YotsubaShader.WgslSyntax;
using YotsubaShader.GlslSyntax.Types;
using YotsubaShader.Language;
namespace MyShaders;
public class Gradient
{
[ShaderStage(Stage.Vertex)]
public Pixel Vertex(Corner corner)
{
Pixel pixel;
pixel.Position = Make.Vec4(corner.Position.X, corner.Position.Y, 0f, 1f);
pixel.Uv = corner.Uv;
return pixel;
}
[ShaderStage(Stage.Fragment)]
[return: location(0)]
public vec4 Fragment(PixelIn pixel)
{
return Make.Vec4(1f, 0f, 0f, 1f);
}
}using YotsubaShader.SpirvSyntax;
using YotsubaShader.GlslSyntax.Types;
using YotsubaShader.Language;
namespace MyShaders;
public class Gradient
{
[ShaderStage(Stage.Vertex)]
public Pixel Vertex(Corner corner)
{
Pixel pixel;
pixel.Position = Make.Vec4(corner.Position.X, corner.Position.Y, 0f, 1f);
pixel.Uv = corner.Uv;
return pixel;
}
[ShaderStage(Stage.Fragment)]
[return: Location(0)]
public vec4 Fragment(PixelIn pixel)
{
return Make.Vec4(1f, 0f, 0f, 1f);
}
}A shader is a normal class, with one method per stage. The class is called Gradient because that is the name of the shader: that is how you are going to ask for it later, with new Gradient().
There is a new using, YotsubaShader.Language. That is where [ShaderStage] and Stage come from.
Compile it with add#
You now have a shader written. Next it has to be turned into something the GPU understands. From the Tutorial folder, run the command you saw in the previous chapter:
dotnet yotsuba add MyShaders/MyShaders.csproj --target spirvThe first time it takes a while, because the compiler itself is also built. When it finishes you will see something like this (the CLI prints its messages in Spanish; this one means "File generated"):
Archivo generado: /path/to/Tutorial/MyShaders/YotsubaShader.g.csOpen the MyShaders folder. There is a new file you did not write: YotsubaShader.g.cs.
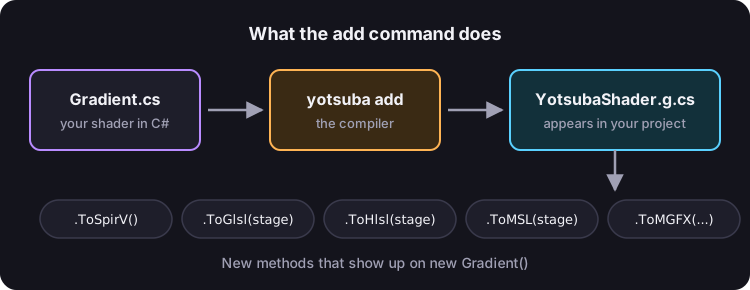
That is what add does: it compiles every shader in your project and adds to your project a C# file with the result. That file gives your Gradient class new methods:
| Method | What it returns |
|---|---|
ToGlsl(stage) | The shader translated to GLSL (OpenGL), as text. |
ToGlslEs(stage) | The same, in the GLSL variant for mobile and web. |
ToHlsl(stage) | The shader translated to HLSL (DirectX), as text. |
ToMSL(stage) | The shader translated to Metal (Apple), as text. |
ToSpirV() | The shader in SPIR-V, Vulkan's binary format, as byte[]. |
ToMGFX(platform), ToKNIWebGL_FX(), ToFNA_FX() | The shader ready to load in MonoGame, KNI or FNA, as byte[]. These three appear only if you ask for the engine's plugin with --target fna, --target kni or --target fna. You will do it in Your window to see shaders. |
That is, you do not have to load files or remember paths. Your shader is a class, and you ask that same class for the compiled result.
Use the result#
Let's ask Gradient for its GLSL version and show it in the console. Open TryIt/Program.cs, delete whatever is there and write this:
using MyShaders;
using YotsubaShader;
using YotsubaShader.Language;

var shader = new Gradient();

Console.WriteLine(shader.ToGlsl(Stage.Fragment));
And run it:
dotnet run --project TryItThis is what comes out:
#version 450

struct Pixel
{
    vec4 Position;
    vec2 Uv;
};

layout(location = 0) in vec2 pixel_Uv;
layout(location = 0) out vec4 _return;

vec4 Vec4(float x, float y, float z, float w)
{
    vec4 v;
    v.x = x;
    v.y = y;
    v.z = z;
    v.w = w;
    return v;
}

void main()
{
    _return = Vec4(1.0, 0.0, 0.0, 1.0);
}
Look at it calmly, because everything you wrote is there, translated to another language:
- Your
struct Pixelis there. - Your
Make.Vec4function is there, even though you wrote it in another file. The compiler only brought along what the shader uses:Vec2andVec3do not appear. - Your
Fragmentmethod is themain()at the end.
And your doors are there too. Look at these two lines:
layout(location = 0) in vec2 pixel_Uv;
layout(location = 0) out vec4 _return;
The first one says in: it is the Uv that arrives through slot 0 of door B. The second one says out: it is the color that leaves through slot 0 of door C. Two zeros, one coming in and one going out, and GLSL tells them apart the same way you do: by the door.
That text is a real GLSL shader. If you give it to OpenGL, it paints the screen red.
Look at the Vertex stage too#
Change Stage.Fragment to Stage.Vertex in TryIt/Program.cs and run it again. Now your Vertex method comes out:
#version 450

struct Pixel
{
    vec4 Position;
    vec2 Uv;
};

layout(location = 0) in vec2 corner_Position;
layout(location = 1) in vec2 corner_Uv;
layout(location = 0) out vec2 _return_Uv;

vec4 Vec4(float x, float y, float z, float w)
{
    vec4 v;
    v.x = x;
    v.y = y;
    v.z = z;
    v.w = w;
    return v;
}

void main()
{
    Pixel pixel;
    pixel.Position = Vec4(corner_Position.x, corner_Position.y, 0.0, 1.0);
    pixel.Uv = corner_Uv;
    gl_Position = pixel.Position;
    _return_Uv = pixel.Uv;
}
Here you can see doors A and B in full:
- The two lines with
inare door A: the position in slot 0 and theUvin slot 1. - The line with
outis door B: theUvleaving through slot 0. - And the final position has no
layoutand no number. It shows up at the end asgl_Position = pixel.Position;. It is the special data, the one the GPU keeps.
Put Stage.Fragment back before you continue.
Now for real, the gradient#
A red screen is not very exciting. To make a gradient, the color has to be different at each pixel. And what is different about one pixel compared to another? Its Uv.
Remember that the Uv only exists at the four corners, but the Fragment function runs for every pixel, including the ones in the middle. It is the spreading again: the GPU gives each pixel the mix that corresponds to it.
So inside Fragment, pixel.Uv.Y is 0 at the top pixels, 1 at the bottom ones, and rises little by little in between. That is exactly what a gradient needs.
Replace the Fragment method with this one. The complete file looks like this:
using YotsubaShader.GlslSyntax;
using YotsubaShader.GlslSyntax.Types;
using YotsubaShader.Language;

namespace MyShaders;

public class Gradient
{
    [ShaderStage(Stage.Vertex)]
    public Pixel Vertex(Corner corner)
    {
        Pixel pixel;
        pixel.Position = Make.Vec4(corner.Position.X, corner.Position.Y, 0f, 1f);
        pixel.Uv = corner.Uv;
        return pixel;
    }

    [ShaderStage(Stage.Fragment)]
    [return: location(0)]
    public vec4 Fragment(PixelIn pixel)
    {
        float red = 1f;
        float green = 0.25f + 0.6f * pixel.Uv.Y;
        float blue = 0.45f - 0.35f * pixel.Uv.Y;
        return Make.Vec4(red, green, blue, 1f);
    }
}using YotsubaShader.HlslSyntax;
using YotsubaShader.GlslSyntax.Types;
using YotsubaShader.Language;
namespace MyShaders;
public class Gradient
{
[ShaderStage(Stage.Vertex)]
public Pixel Vertex(Corner corner)
{
Pixel pixel;
pixel.Position = Make.Vec4(corner.Position.X, corner.Position.Y, 0f, 1f);
pixel.Uv = corner.Uv;
return pixel;
}
[ShaderStage(Stage.Fragment)]
[return: SV_Target]
public vec4 Fragment(PixelIn pixel)
{
float red = 1f;
float green = 0.25f + 0.6f * pixel.Uv.Y;
float blue = 0.45f - 0.35f * pixel.Uv.Y;
return Make.Vec4(red, green, blue, 1f);
}
}using YotsubaShader.MslSyntax;
using YotsubaShader.GlslSyntax.Types;
using YotsubaShader.Language;
namespace MyShaders;
public class Gradient
{
[ShaderStage(Stage.Vertex)]
public Pixel Vertex(Corner corner)
{
Pixel pixel;
pixel.Position = Make.Vec4(corner.Position.X, corner.Position.Y, 0f, 1f);
pixel.Uv = corner.Uv;
return pixel;
}
[ShaderStage(Stage.Fragment)]
[return: color(0)]
public vec4 Fragment(PixelIn pixel)
{
float red = 1f;
float green = 0.25f + 0.6f * pixel.Uv.Y;
float blue = 0.45f - 0.35f * pixel.Uv.Y;
return Make.Vec4(red, green, blue, 1f);
}
}using YotsubaShader.WgslSyntax;
using YotsubaShader.GlslSyntax.Types;
using YotsubaShader.Language;
namespace MyShaders;
public class Gradient
{
[ShaderStage(Stage.Vertex)]
public Pixel Vertex(Corner corner)
{
Pixel pixel;
pixel.Position = Make.Vec4(corner.Position.X, corner.Position.Y, 0f, 1f);
pixel.Uv = corner.Uv;
return pixel;
}
[ShaderStage(Stage.Fragment)]
[return: location(0)]
public vec4 Fragment(PixelIn pixel)
{
float red = 1f;
float green = 0.25f + 0.6f * pixel.Uv.Y;
float blue = 0.45f - 0.35f * pixel.Uv.Y;
return Make.Vec4(red, green, blue, 1f);
}
}using YotsubaShader.SpirvSyntax;
using YotsubaShader.GlslSyntax.Types;
using YotsubaShader.Language;
namespace MyShaders;
public class Gradient
{
[ShaderStage(Stage.Vertex)]
public Pixel Vertex(Corner corner)
{
Pixel pixel;
pixel.Position = Make.Vec4(corner.Position.X, corner.Position.Y, 0f, 1f);
pixel.Uv = corner.Uv;
return pixel;
}
[ShaderStage(Stage.Fragment)]
[return: Location(0)]
public vec4 Fragment(PixelIn pixel)
{
float red = 1f;
float green = 0.25f + 0.6f * pixel.Uv.Y;
float blue = 0.45f - 0.35f * pixel.Uv.Y;
return Make.Vec4(red, green, blue, 1f);
}
}Do the math for two pixels and you will see it clearly:
| Pixel | Uv.Y | Red | Green | Blue | Color |
|---|---|---|---|---|---|
| One at the top | 0 | 1 | 0.25 | 0.45 | Pink |
| One at the bottom | 1 | 1 | 0.85 | 0.10 | Orange-yellow |
The pixels in the middle land between one color and the other. You did not write any loop: the GPU runs those four lines for each pixel, and each one arrives with its own Uv.
Compile and run again:
dotnet yotsuba add MyShaders/MyShaders.csproj --target spirvdotnet run --project TryItNow the main() in the output is this:
void main()
{
    float red = 1.0;
    float green = 0.25 + (0.60000002384185791015625 * pixel_Uv.y);
    float blue = 0.449999988079071044921875 - (0.3499999940395355224609375 * pixel_Uv.y);
    _return = Vec4(red, green, blue, 1.0);
}
They are your same lines. The long numbers are your 0.6f, 0.45f and 0.35f, written with all the decimals a float keeps inside.
The same shader, for other graphics APIs#
So far you asked for GLSL. But the file add generated carries every format. Change TryIt/Program.cs to this:
using MyShaders;
using YotsubaShader;
using YotsubaShader.Language;

var shader = new Gradient();

Console.WriteLine("--- GLSL ---");
Console.WriteLine(shader.ToGlsl(Stage.Fragment));

Console.WriteLine("--- HLSL ---");
Console.WriteLine(shader.ToHlsl(Stage.Fragment));

Console.WriteLine("--- Metal ---");
Console.WriteLine(shader.ToMSL(Stage.Fragment));

byte[] spirv = shader.ToSpirV();
File.WriteAllBytes("Gradient.spv", spirv);
Console.WriteLine($"Gradient.spv: {spirv.Length} bytes");
This time you do not need to run add, because the shader did not change. Just run dotnet run --project TryIt.
You will see your shader three times, in three different languages, and a new Gradient.spv file in the folder you ran it from. For example, this is how your method looks in HLSL:
void Fragment_inner()
{
    float red = 1.0f;
    float green = 0.25f + (0.60000002384185791015625f * pixel_Uv.y);
    float blue = 0.449999988079071044921875f - (0.3499999940395355224609375f * pixel_Uv.y);
    _return = Vec4(red, green, blue, 1.0f);
}
You wrote the shader only once, in C#, and you have it for OpenGL, DirectX, Metal and Vulkan.
And how do I see it on screen?#
So far you have only seen the gradient as an image in the tutorial and as text in the console. To see it really drawn you need a window and something that sends the rectangle to the GPU. A game engine or a graphics API does that, and each one does it its own way.
That is why the next chapter has you make a small window, a viewer, that draws the shader you tell it. It is a work tool and does not depend on any particular engine: your shaders stay the same. With it, every chapter from now on will ask you to write, run and see what you do. When you finish, in What now?, you pick your engine and see how to load there what add gives you.
What you learned#
- A shader in C# is a few
structs and a class with two methods. - Door A is a
structwith[location(n)]on each field: what your game sends for each vertex. - Door B is another
struct: the final position marked with[gl_Position], and your data with[location(n)]. - Door C is
[return: location(0)]above the Fragment method. - Each door counts its slots from 0. That is why there are three
location(0)and they do not clash. - Each stage is a method marked with
[ShaderStage]. Vertex returns the position and lets data through; Fragment returns the color, avec4with values from0to1. - What Vertex returns reaches Fragment spread across the pixels. That is why
Uvis different at each one. - The
addcommand compiles your shaders and addsYotsubaShader.g.csto your project. From there,new Gradient().ToGlsl(...)and its siblings give you the compiled shader.