
Mixing and smoothing
The three most used tools in shaders, mix, clamp and smoothstep, written by you from scratch.
If you ask someone who makes shaders which function they use the most, they will probably tell you mix. It is used to go from one value to another little by little. With it you make gradients, changes from one color to another, soft edges, lights that fade out.
The GPU already comes with that function made, just like two sibling functions: clamp and smoothstep. But in Yotsuba Shader they cannot be called from C# yet (you will see it flagged in the neon ring chapter). And for learning, that is a stroke of luck: you are going to write them yourself. Once you have made them with your own hands, there will be no mystery left in them.
Step 1: mixing two numbers#
Copy Template.cs as Mixing.cs and change the class name to Mixing.
The idea of mixing is this: you have a starting value a, an end value b, and a number t between 0 and 1 that says how much of the way you have gone.
- With
t = 0, you are ata. - With
t = 1, you are atb. - With
t = 0.5, you are exactly in the middle.
The formula is a + (b - a) * t. Try it with paper: if a = 10, b = 20 and t = 0.3, then b - a is 10, times 0.3 gives 3, plus 10 gives 13. 30% of the way between 10 and 20.
Write the function inside the Mixing class, after Fragment:
    public static float Mix(float a, float b, float t)
    {
        return a + (b - a) * t;
    }
And use it in Fragment to make a sky gradient. Replace the return line with this:
float t = pixel.Uv.Y;
float r = Mix(0.1f, 1f, t);
float g = Mix(0.2f, 0.6f, t);
float b = Mix(0.6f, 0.2f, t);
return Make.Vec4(r, g, b, 1f);
Here t is the pixel's height: 0 at the top and 1 at the bottom. Each color channel is mixed separately, from its top value to its bottom value. Notice the blue: it goes down from 0.6 to 0.2, while red goes up from 0.1 to 1.
Run the work cycle:
But first, tell the viewer about the new shader. In Viewer/Program.cs, add this line to the switch, above the _ => line:
"Mixing" => new Mixing().ToFNA_FX(),Now run it:
dotnet yotsuba add MyShaders/MyShaders.csproj --target spirv --target fna && dotnet run --project Viewer -- Mixing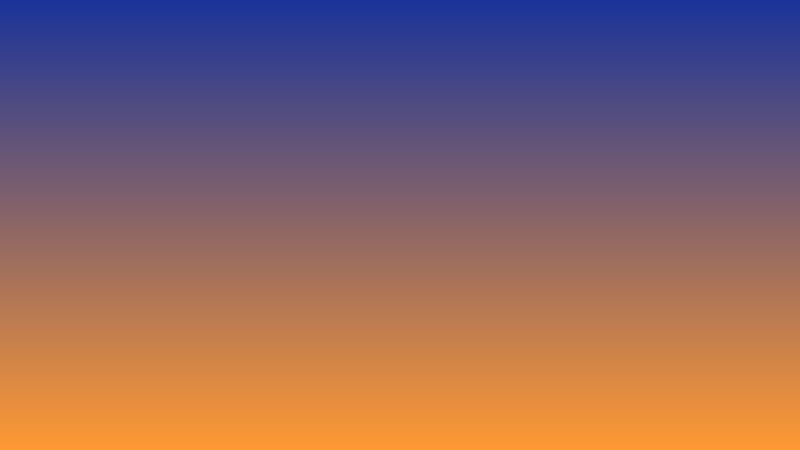
A sunset sky with a single function. Change the numbers to your liking, and you will see how each channel moves on its own.
Step 2: what if t goes outside 0 to 1?#
Mix works perfectly as long as t is between 0 and 1. But if t is 2, the formula does not stop at b: it goes past it. With a = 10 and b = 20, t = 2 gives 30.
Sometimes that is what you want. But many times you will want the result to stay put at a or at b when you go over. That tool is called clamp (limit), and it is very short. Add it below Mix:
    public static float Clamp(float value, float min, float max)
    {
        if (value < min)
        {
            return min;
        }
        if (value > max)
        {
            return max;
        }
        return value;
    }
If the value is less than the minimum, it returns the minimum. If it is greater than the maximum, it returns the maximum. If not, it leaves it as it is. Clamp(5f, 0f, 1f) gives 1; Clamp(-3f, 0f, 1f) gives 0; and Clamp(0.4f, 0f, 1f) gives 0.4.
We are not going to use it yet, but the next function will need it.
Step 3: soft edges#
In the decisions chapter you saw that an if makes hard edges. For a soft edge we need something that is not all or nothing: a number that goes from 0 to 1 little by little.
That is the job of smoothstep. You give it three things: where the change starts (start), where it ends (end) and the value you are looking at. It returns:
0if the value is before the start.1if the value is after the end.- A number between
0and1if it is in the middle, rising smoothly.
Add it below Clamp:
    public static float Smooth(float start, float end, float value)
    {
        float t = Clamp((value - start) / (end - start), 0f, 1f);
        return t * t * (3f - 2f * t);
    }
It has two lines, and each one does something different:
(value - start) / (end - start)turns the value into at:0when value isstart,1when value isend. AndClampcuts it so it never leaves0to1. Up to here it is a straight ramp.t * t * (3f - 2f * t)smooths the ramp. At the beginning it rises slowly, in the middle faster, and at the end it slows down again, like an S-shaped letter.
See how the path changes:
t (straight ramp) | Smoothed result |
|---|---|
| 0 | 0 |
| 0.25 | 0.156 |
| 0.5 | 0.5 |
| 0.75 | 0.844 |
| 1 | 1 |
With the straight ramp, at a quarter of the way you are at a quarter of the height. With the smoothed one, at a quarter of the way you are barely at 16%. That slow start and slow end are what makes it look "smooth".
Step 4: a circle with a soft edge#
Let us apply it. Declare the uniform, as in the previous chapters. At the top:
using YotsubaShader.GlslSyntax.Resources;using YotsubaShader.HlslSyntax.Resources;using YotsubaShader.MslSyntax.Resources;using YotsubaShader.WgslSyntax.Resources;using YotsubaShader.SpirvSyntax.Resources;And inside the class, before Vertex:
    [uniform, layout(0, 0)]
public Context Data; [cbuffer, register("b0")]
public Context Data; [constant, buffer(0)]
public Context Data; [uniform, @group(0), @binding(0)]
public Context Data; [Uniform, DescriptorSet(0), Binding(0)]
public Context Data;Now replace the entire contents of Fragment with this:
float aspect = Data.Width / Data.Height;
float dx = (pixel.Uv.X - 0.5f) * aspect;
float dy = pixel.Uv.Y - 0.5f;
float d2 = dx * dx + dy * dy;
float brightness = 1f - Smooth(0.04f, 0.09f, d2);
return Make.Vec4(brightness, brightness * 0.6f, brightness * 0.1f, 1f);The important part is in the two middle lines. d2 is the usual calculation for how far the pixel is from the center. Then:
Smooth(0.04f, 0.09f, d2)is0whend2is less than0.04(near the center),1when it is greater than0.09(far away), and rises smoothly in between.1f - ...flips it: now it is1at the center and0outside. That is the brightness.
The three numbers in the last line (brightness, brightness * 0.6f, brightness * 0.1f) tint the light orange: more red, some green, almost no blue.

Compare it with the circle from the previous chapter. There is no sharp edge anymore: the light fades out. Change the 0.04f to 0.085f and the edge becomes almost sharp. Change the 0.09f to 0.2f and the light blurs much more. The closer start and end are, the harder the edge.
Step 5: a complete sunset#
Let us put it all together in a scene. We will do it little by little, so you can see how each layer adds up. Replace the contents of Fragment with this first version, which is the sky:
float aspect = Data.Width / Data.Height;
float dx = (pixel.Uv.X - 0.5f) * aspect;
float dy = pixel.Uv.Y - 0.62f;
float d2 = dx * dx + dy * dy;
// sky: from dark blue at the top to orange at the horizon
float t = pixel.Uv.Y;
float r = Mix(0.1f, 1f, t);
float g = Mix(0.1f, 0.5f, t);
float b = Mix(0.35f, 0.3f, t);
return Make.Vec4(r, g, b, 1f);Nothing new except that dy is now measured from 0.62 (the sun's height, a bit below the center). Run the work cycle to see the sky.
Layer 1: the halo. Add this before the return:
// sun halo
float halo = 1f - Smooth(0.0f, 0.25f, d2);
r = r + halo * 0.5f;
g = g + halo * 0.3f;A halo is a very big and very soft circle: it goes from 0 to 0.25. And instead of replacing the sky color, it adds to it: the sky is still there, but with more light near the sun. Run the work cycle.
Layer 2: the disc. Add this after the halo:
// sun disc
float disc = 1f - Smooth(0.012f, 0.018f, d2);
r = Mix(r, 1f, disc);
g = Mix(g, 0.95f, disc);
b = Mix(b, 0.7f, disc);The disc is a small circle with an almost hard edge (0.012 to 0.018, very close together). Here we use Mix in a different way: disc is 1 inside the sun and 0 outside, so Mix(r, 1f, disc) leaves the sky where disc is 0 and puts the sun's color where it is 1. On the pixels at the edge, it mixes both. Mixing with a t that is 0 or 1 is an if with soft edges. Run the work cycle.
Layer 3: the ground. And to finish, a dark strip at the bottom. Add this, and replace the return with the new version:
// ground
if (pixel.Uv.Y > 0.7f)
{
r = 0.05f;
g = 0.05f;
b = 0.1f;
}
return Make.Vec4(Clamp(r, 0f, 1f), Clamp(g, 0f, 1f), Clamp(b, 0f, 1f), 1f);Here we see Clamp again: when adding the halo, red or green can go over 1. The GPU would clip them on its own, but writing it by hand makes clear what is going on.
Run the work cycle.
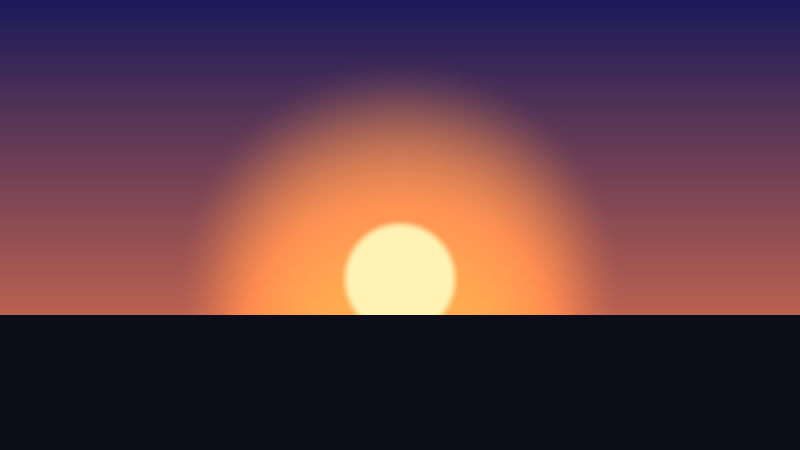
Three functions written by you, and you have a sunset. Play with it: raise the sun by changing the 0.62, enlarge the halo by changing the 0.25, or change the sky colors.
All together#
This is the complete file:
using YotsubaShader.GlslSyntax;
using YotsubaShader.GlslSyntax.Resources;
using YotsubaShader.GlslSyntax.Types;
using YotsubaShader.Language;
namespace MyShaders;
public class Mixing
{
[uniform, layout(0, 0)]
public Context Data;
[ShaderStage(Stage.Vertex)]
public Pixel Vertex(Corner corner)
{
Pixel pixel;
pixel.Position = Make.Vec4(corner.Position.X, corner.Position.Y, 0f, 1f);
pixel.Uv = corner.Uv;
return pixel;
}
[ShaderStage(Stage.Fragment)]
[return: location(0)]
public vec4 Fragment(PixelIn pixel)
{
float aspect = Data.Width / Data.Height;
float dx = (pixel.Uv.X - 0.5f) * aspect;
float dy = pixel.Uv.Y - 0.62f;
float d2 = dx * dx + dy * dy;
// sky: from dark blue at the top to orange at the horizon
float t = pixel.Uv.Y;
float r = Mix(0.1f, 1f, t);
float g = Mix(0.1f, 0.5f, t);
float b = Mix(0.35f, 0.3f, t);
// sun halo and sun disc
float halo = 1f - Smooth(0.0f, 0.25f, d2);
float disc = 1f - Smooth(0.012f, 0.018f, d2);
r = r + halo * 0.5f;
g = g + halo * 0.3f;
r = Mix(r, 1f, disc);
g = Mix(g, 0.95f, disc);
b = Mix(b, 0.7f, disc);
// ground
if (pixel.Uv.Y > 0.7f)
{
r = 0.05f;
g = 0.05f;
b = 0.1f;
}
return Make.Vec4(Clamp(r, 0f, 1f), Clamp(g, 0f, 1f), Clamp(b, 0f, 1f), 1f);
}
public static float Clamp(float value, float min, float max)
{
if (value < min)
{
return min;
}
if (value > max)
{
return max;
}
return value;
}
public static float Mix(float a, float b, float t)
{
return a + (b - a) * t;
}
public static float Smooth(float start, float end, float value)
{
float t = Clamp((value - start) / (end - start), 0f, 1f);
return t * t * (3f - 2f * t);
}
}using YotsubaShader.HlslSyntax;
using YotsubaShader.HlslSyntax.Resources;
using YotsubaShader.GlslSyntax.Types;
using YotsubaShader.Language;
namespace MyShaders;
public class Mixing
{
    [cbuffer, register("b0")]
    public Context Data;
[ShaderStage(Stage.Vertex)]
public Pixel Vertex(Corner corner)
{
Pixel pixel;
pixel.Position = Make.Vec4(corner.Position.X, corner.Position.Y, 0f, 1f);
pixel.Uv = corner.Uv;
return pixel;
}
[ShaderStage(Stage.Fragment)]
[return: SV_Target]
public vec4 Fragment(PixelIn pixel)
{
float aspect = Data.Width / Data.Height;
float dx = (pixel.Uv.X - 0.5f) * aspect;
float dy = pixel.Uv.Y - 0.62f;
float d2 = dx * dx + dy * dy;
// sky: from dark blue at the top to orange at the horizon
float t = pixel.Uv.Y;
float r = Mix(0.1f, 1f, t);
float g = Mix(0.1f, 0.5f, t);
float b = Mix(0.35f, 0.3f, t);
// sun halo and sun disc
float halo = 1f - Smooth(0.0f, 0.25f, d2);
float disc = 1f - Smooth(0.012f, 0.018f, d2);
r = r + halo * 0.5f;
g = g + halo * 0.3f;
r = Mix(r, 1f, disc);
g = Mix(g, 0.95f, disc);
b = Mix(b, 0.7f, disc);
// ground
if (pixel.Uv.Y > 0.7f)
{
r = 0.05f;
g = 0.05f;
b = 0.1f;
}
return Make.Vec4(Clamp(r, 0f, 1f), Clamp(g, 0f, 1f), Clamp(b, 0f, 1f), 1f);
}
public static float Clamp(float value, float min, float max)
{
if (value < min)
{
return min;
}
if (value > max)
{
return max;
}
return value;
}
public static float Mix(float a, float b, float t)
{
return a + (b - a) * t;
}
public static float Smooth(float start, float end, float value)
{
float t = Clamp((value - start) / (end - start), 0f, 1f);
return t * t * (3f - 2f * t);
}
}using YotsubaShader.MslSyntax;
using YotsubaShader.MslSyntax.Resources;
using YotsubaShader.GlslSyntax.Types;
using YotsubaShader.Language;
namespace MyShaders;
public class Mixing
{
    [constant, buffer(0)]
    public Context Data;
[ShaderStage(Stage.Vertex)]
public Pixel Vertex(Corner corner)
{
Pixel pixel;
pixel.Position = Make.Vec4(corner.Position.X, corner.Position.Y, 0f, 1f);
pixel.Uv = corner.Uv;
return pixel;
}
[ShaderStage(Stage.Fragment)]
[return: color(0)]
public vec4 Fragment(PixelIn pixel)
{
float aspect = Data.Width / Data.Height;
float dx = (pixel.Uv.X - 0.5f) * aspect;
float dy = pixel.Uv.Y - 0.62f;
float d2 = dx * dx + dy * dy;
// sky: from dark blue at the top to orange at the horizon
float t = pixel.Uv.Y;
float r = Mix(0.1f, 1f, t);
float g = Mix(0.1f, 0.5f, t);
float b = Mix(0.35f, 0.3f, t);
// sun halo and sun disc
float halo = 1f - Smooth(0.0f, 0.25f, d2);
float disc = 1f - Smooth(0.012f, 0.018f, d2);
r = r + halo * 0.5f;
g = g + halo * 0.3f;
r = Mix(r, 1f, disc);
g = Mix(g, 0.95f, disc);
b = Mix(b, 0.7f, disc);
// ground
if (pixel.Uv.Y > 0.7f)
{
r = 0.05f;
g = 0.05f;
b = 0.1f;
}
return Make.Vec4(Clamp(r, 0f, 1f), Clamp(g, 0f, 1f), Clamp(b, 0f, 1f), 1f);
}
public static float Clamp(float value, float min, float max)
{
if (value < min)
{
return min;
}
if (value > max)
{
return max;
}
return value;
}
public static float Mix(float a, float b, float t)
{
return a + (b - a) * t;
}
public static float Smooth(float start, float end, float value)
{
float t = Clamp((value - start) / (end - start), 0f, 1f);
return t * t * (3f - 2f * t);
}
}using YotsubaShader.WgslSyntax;
using YotsubaShader.WgslSyntax.Resources;
using YotsubaShader.GlslSyntax.Types;
using YotsubaShader.Language;
namespace MyShaders;
public class Mixing
{
    [uniform, @group(0), @binding(0)]
    public Context Data;
[ShaderStage(Stage.Vertex)]
public Pixel Vertex(Corner corner)
{
Pixel pixel;
pixel.Position = Make.Vec4(corner.Position.X, corner.Position.Y, 0f, 1f);
pixel.Uv = corner.Uv;
return pixel;
}
[ShaderStage(Stage.Fragment)]
[return: location(0)]
public vec4 Fragment(PixelIn pixel)
{
float aspect = Data.Width / Data.Height;
float dx = (pixel.Uv.X - 0.5f) * aspect;
float dy = pixel.Uv.Y - 0.62f;
float d2 = dx * dx + dy * dy;
// sky: from dark blue at the top to orange at the horizon
float t = pixel.Uv.Y;
float r = Mix(0.1f, 1f, t);
float g = Mix(0.1f, 0.5f, t);
float b = Mix(0.35f, 0.3f, t);
// sun halo and sun disc
float halo = 1f - Smooth(0.0f, 0.25f, d2);
float disc = 1f - Smooth(0.012f, 0.018f, d2);
r = r + halo * 0.5f;
g = g + halo * 0.3f;
r = Mix(r, 1f, disc);
g = Mix(g, 0.95f, disc);
b = Mix(b, 0.7f, disc);
// ground
if (pixel.Uv.Y > 0.7f)
{
r = 0.05f;
g = 0.05f;
b = 0.1f;
}
return Make.Vec4(Clamp(r, 0f, 1f), Clamp(g, 0f, 1f), Clamp(b, 0f, 1f), 1f);
}
public static float Clamp(float value, float min, float max)
{
if (value < min)
{
return min;
}
if (value > max)
{
return max;
}
return value;
}
public static float Mix(float a, float b, float t)
{
return a + (b - a) * t;
}
public static float Smooth(float start, float end, float value)
{
float t = Clamp((value - start) / (end - start), 0f, 1f);
return t * t * (3f - 2f * t);
}
}using YotsubaShader.SpirvSyntax;
using YotsubaShader.SpirvSyntax.Resources;
using YotsubaShader.GlslSyntax.Types;
using YotsubaShader.Language;
namespace MyShaders;
public class Mixing
{
    [Uniform, DescriptorSet(0), Binding(0)]
    public Context Data;
[ShaderStage(Stage.Vertex)]
public Pixel Vertex(Corner corner)
{
Pixel pixel;
pixel.Position = Make.Vec4(corner.Position.X, corner.Position.Y, 0f, 1f);
pixel.Uv = corner.Uv;
return pixel;
}
[ShaderStage(Stage.Fragment)]
[return: Location(0)]
public vec4 Fragment(PixelIn pixel)
{
float aspect = Data.Width / Data.Height;
float dx = (pixel.Uv.X - 0.5f) * aspect;
float dy = pixel.Uv.Y - 0.62f;
float d2 = dx * dx + dy * dy;
// sky: from dark blue at the top to orange at the horizon
float t = pixel.Uv.Y;
float r = Mix(0.1f, 1f, t);
float g = Mix(0.1f, 0.5f, t);
float b = Mix(0.35f, 0.3f, t);
// sun halo and sun disc
float halo = 1f - Smooth(0.0f, 0.25f, d2);
float disc = 1f - Smooth(0.012f, 0.018f, d2);
r = r + halo * 0.5f;
g = g + halo * 0.3f;
r = Mix(r, 1f, disc);
g = Mix(g, 0.95f, disc);
b = Mix(b, 0.7f, disc);
// ground
if (pixel.Uv.Y > 0.7f)
{
    r = 0.05f;
    g = 0.05f;
    b = 0.1f;
}
return Make.Vec4(Clamp(r, 0f, 1f), Clamp(g, 0f, 1f), Clamp(b, 0f, 1f), 1f);
}
public static float Clamp(float value, float min, float max)
{
if (value < min)
{
return min;
}
if (value > max)
{
return max;
}
return value;
}
public static float Mix(float a, float b, float t)
{
return a + (b - a) * t;
}
public static float Smooth(float start, float end, float value)
{
float t = Clamp((value - start) / (end - start), 0f, 1f);
return t * t * (3f - 2f * t);
}
}What you learned#
Mix(a, b, t)goes fromatobaccording tot. Withtbetween0and1, the result always stays betweenaandb.Clampcuts a value between a minimum and a maximum.Smoothgoes from0to1slowly at the start and slowly at the end. The closerstartandendare, the harder the edge.- Mixing with a
tof0or1is anifwith soft edges. - A scene is built in layers: each layer mixes or adds something over what was there.
- In GLSL these three functions are called
mix,clampandsmoothstep. When you see them in other tutorials, you know what they do inside.
Next: Repeating with loops.