
Your window for seeing shaders
A small viewer that draws the shader you choose in a window, so you can see every change.
So far you have compiled a shader and read its code in the console. But a shader is made to be seen. A shader whose result you never see is like a recipe you never cook: you learn nothing from it.
That is why, from this chapter on, the way of working changes. Everything that follows works like this:
- You write a little code.
- You compile it.
- You look at it in a window.
- You change one number and look again.
For step 3 you need that window. You are going to build it now, just once.
What the viewer is#
The viewer is a program of about 70 lines that does three things:
- It opens a window.
- It draws a rectangle that covers the whole window (the same rectangle from Shader 1).
- It puts on it the shader you name.
Notice one thing: the viewer is not part of your shader. Your shaders stay in MyShaders, knowing nothing about windows. The viewer is just a work tool, like a bench for testing parts. We use KNI to open the window because it is short and works the same on Windows, Mac and Linux. When you want to take your shaders to your game, you will use the same library with the engine you prefer.
Step 1: create the project#
From the Tutorial folder:
dotnet new console -n Viewer -f net8.0
dotnet add Viewer package nkast.Kni.Platform.SDL2.GL
dotnet add Viewer reference MyShaders/MyShaders.csproj- The first line creates an empty console program called
Viewer. - The second adds KNI to it, which is what opens the window.
- The third tells it that it can use your shaders. This way, every change you make in
MyShaderswill be seen by the viewer without copying anything.
Your folder looks like this:
Tutorial/
├── MyShaders/        your shaders
├── TryIt/            the console from the previous chapter
└── Viewer/           new: the window
Step 2: describe the vertex, on the window's side#
In How a shader is built you saw that the game hands the shader a list of vertices, and that each one carries a position and a Uv. In the shader you already wrote what a vertex looks like (the Corner struct). Now you have to write the same thing on the plain C# side, so that window and shader understand each other.
Create Viewer/ScreenCorner.cs:
using Microsoft.Xna.Framework;
using Microsoft.Xna.Framework.Graphics;

public readonly struct ScreenCorner(Vector2 posicion, Vector2 uv) : IVertexType
{
    private static readonly VertexDeclaration Declaracion = new(
        new VertexElement(0, VertexElementFormat.Vector2, VertexElementUsage.TextureCoordinate, 0),
        new VertexElement(8, VertexElementFormat.Vector2, VertexElementUsage.TextureCoordinate, 1));

    public readonly Vector2 Position = posicion;
    public readonly Vector2 Uv = uv;

    VertexDeclaration IVertexType.VertexDeclaration => Declaracion;
}
The only important thing here is that it matches your Corner: first two numbers for the position (slot 0), then two for the Uv (slot 1). If you ever change Corner, you will have to change ScreenCorner the same way.
Step 3: an empty window#
Replace the entire contents of Viewer/Program.cs with this:
using Microsoft.Xna.Framework;
using Microsoft.Xna.Framework.Graphics;
using Microsoft.Xna.Framework.Input;

string name = args.Length > 0 ? args[0] : "Gradient";

using var viewer = new Viewer(name);
viewer.Run();

public class Viewer : Game
{
    private readonly string _name;

    public Viewer(string name)
    {
        _name = name;
        var graphics = new GraphicsDeviceManager(this)
        {
            PreferredBackBufferWidth = 800,
            PreferredBackBufferHeight = 450,
        };
        Window.AllowUserResizing = true;
        Window.Title = name;
    }

    protected override void Update(GameTime gameTime)
    {
        if (Keyboard.GetState().IsKeyDown(Keys.Escape))
        {
            Exit();
        }
        base.Update(gameTime);
    }

    protected override void Draw(GameTime gameTime)
    {
        GraphicsDevice.Clear(Color.CornflowerBlue);
        base.Draw(gameTime);
    }
}
Look at the three parts:
- The first line takes the name of the shader you type when you run it. If you type none, it uses
Gradient. - The
Viewer(...)constructor asks for a window of 800 by 450 pixels. It is wide on purpose: later it will help you discover a typical shader problem. You can also stretch it with the mouse. Updatecloses the window when you press Esc.Drawpaints it blue, for now.
Run it:
dotnet run --project ViewerA blue window should appear. Close it with Esc. If you see it, KNI works on your computer and nothing is missing.
Step 4: add the shader#
Now we are going to make the window draw a shader instead of painting itself blue. These are four changes in the same file. Make them one by one.
Change 1. Add these lines at the very top, next to the other using lines:
using MyShaders;
using YotsubaShader;
Change 2. Inside the Viewer class, below private readonly string _name;, add the shader and the rectangle:
    private Effect _shader = null!;

    private readonly ScreenCorner[] _screen =
    [
        new(new Vector2(-1f,  1f), new Vector2(0f, 0f)),
        new(new Vector2( 1f,  1f), new Vector2(1f, 0f)),
        new(new Vector2(-1f, -1f), new Vector2(0f, 1f)),
        new(new Vector2( 1f, -1f), new Vector2(1f, 1f)),
    ];
These are the four corners of the rectangle. Each one says where it is on the screen (from -1 to 1) and what its Uv is (from 0 to 1). It is the same table you saw in the chapter about how a shader is built.
Change 3. Between the constructor and Update, add a new method that loads your shader:
    protected override void LoadContent()
    {
        // One line per shader of the tutorial: the name you type after `--`, and its class.
        byte[] compiled = _name switch
        {
            "Gradient" => new Gradient().ToKNIWebGL_FX(),
            _ => throw new Exception($"The viewer does not know a shader called \"{_name}\". Add it to the switch."),
        };

        _shader = new Effect(GraphicsDevice, compiled);
    }
ToKNIWebGL_FX is the method Yotsuba Shader creates for each of your shader classes: it returns the shader compiled for KNI. The switch chooses which class to use from the name you type after -- in the terminal. For now it only knows Gradient. Every time you create a new shader you will add one line here, and the chapter will remind you. The last line, _ =>, means "any other name" and gives you a clear error if you misspell it.
Change 4. Replace the whole Draw method with this one:
    protected override void Draw(GameTime gameTime)
    {
        GraphicsDevice.Clear(Color.Black);
        GraphicsDevice.RasterizerState = RasterizerState.CullNone;

        // If your shader declares this data, the viewer hands it over.
        _shader.Parameters["Data_Width"]?.SetValue((float)GraphicsDevice.Viewport.Width);
        _shader.Parameters["Data_Height"]?.SetValue((float)GraphicsDevice.Viewport.Height);
        _shader.Parameters["Data_Seconds"]?.SetValue((float)gameTime.TotalGameTime.TotalSeconds);

        _shader.CurrentTechnique.Passes[0].Apply();
        GraphicsDevice.DrawUserPrimitives(PrimitiveType.TriangleStrip, _screen, 0, 2);

        base.Draw(gameTime);
    }
The three lines that start with _shader.Parameters are a preview: if your shader asks for the window size or the time, the viewer gives them to it. We do not use them yet; in a few chapters you will know what they are for. If your shader does not ask for them, those lines do nothing.
In case something does not add up, this is the complete file:
using Microsoft.Xna.Framework;
using Microsoft.Xna.Framework.Graphics;
using Microsoft.Xna.Framework.Input;
using MyShaders;
using YotsubaShader;

string name = args.Length > 0 ? args[0] : "Gradient";

using var viewer = new Viewer(name);
viewer.Run();

public class Viewer : Game
{
    private readonly string _name;
    private Effect _shader = null!;

    private readonly ScreenCorner[] _screen =
    [
        new(new Vector2(-1f,  1f), new Vector2(0f, 0f)),
        new(new Vector2( 1f,  1f), new Vector2(1f, 0f)),
        new(new Vector2(-1f, -1f), new Vector2(0f, 1f)),
        new(new Vector2( 1f, -1f), new Vector2(1f, 1f)),
    ];

    public Viewer(string name)
    {
        _name = name;
        var graphics = new GraphicsDeviceManager(this)
        {
            PreferredBackBufferWidth = 800,
            PreferredBackBufferHeight = 450,
        };
        Window.AllowUserResizing = true;
        Window.Title = name;
    }

    protected override void LoadContent()
    {
        // One line per shader of the tutorial: the name you type after `--`, and its class.
        byte[] compiled = _name switch
        {
            "Gradient" => new Gradient().ToKNIWebGL_FX(),
            _ => throw new Exception($"The viewer does not know a shader called \"{_name}\". Add it to the switch."),
        };

        _shader = new Effect(GraphicsDevice, compiled);
    }

    protected override void Update(GameTime gameTime)
    {
        if (Keyboard.GetState().IsKeyDown(Keys.Escape))
        {
            Exit();
        }
        base.Update(gameTime);
    }

    protected override void Draw(GameTime gameTime)
    {
        GraphicsDevice.Clear(Color.Black);
        GraphicsDevice.RasterizerState = RasterizerState.CullNone;

        // If your shader declares this data, the viewer hands it over.
        _shader.Parameters["Data_Width"]?.SetValue((float)GraphicsDevice.Viewport.Width);
        _shader.Parameters["Data_Height"]?.SetValue((float)GraphicsDevice.Viewport.Height);
        _shader.Parameters["Data_Seconds"]?.SetValue((float)gameTime.TotalGameTime.TotalSeconds);

        _shader.CurrentTechnique.Passes[0].Apply();
        GraphicsDevice.DrawUserPrimitives(PrimitiveType.TriangleStrip, _screen, 0, 2);

        base.Draw(gameTime);
    }
}
Step 5: see your first shader#
Now for real. Your Gradient from the previous chapter is already compiled, so it is enough to run the viewer:
dotnet run --project Viewer -- GradientWhat comes after -- is the name of the shader you pass to the viewer.

That is your shader, drawn by your computer's GPU. Close it with Esc.
The work cycle#
Now you are going to learn the cycle you will use for the rest of the tutorial. It is always the same:
- You edit a file in
MyShaders. - You compile with
add, so your changes become a shader. - You look with the viewer.
The last two steps fit on one line, joined by && (which means "and if that went well, continue with this"):
dotnet yotsuba add MyShaders/MyShaders.csproj --target spirv --target kni && dotnet run --project Viewer -- GradientThere is one new thing in the command: --target kni. The viewer loads your shader with ToKNIWebGL_FX, and that method is not generated by the CLI alone: it comes from the KNI plugin. With that --target you ask for it. The first time the CLI downloads the plugin (it needs internet only that time), and from then on it uses the copy it saved. The KNI guide explains what the plugin is and what it produces.
Try it now with your first experiment. Open MyShaders/Gradient.cs and find this line in Fragment:
float red = 1f;Change it to this:
float red = pixel.Uv.X;Save and run the command above:
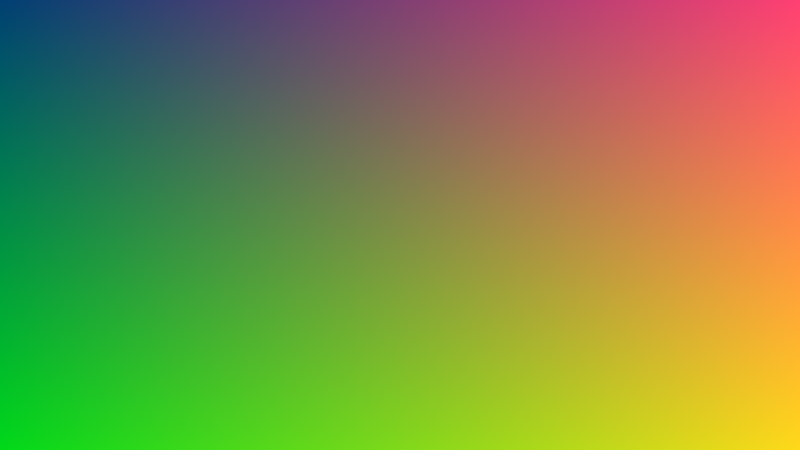
Red no longer has the same value across the whole screen: now it grows from left to right, because pixel.Uv.X goes from 0 at the left edge to 1 at the right. At the left edge there is no red at all and only green and blue remain (dark blue at the top, green at the bottom). On the right, the sunset from before comes back.
You have just done what you will do hundreds of times: change a number and see what happens. Before moving on, put the line back to float red = 1f;.
A starting file#
For each of the following chapters you will create a new shader. They all start the same way, with the same Vertex as always, so it is handy to have it as a mold. Create MyShaders/Template.cs:
using YotsubaShader.GlslSyntax;
using YotsubaShader.GlslSyntax.Types;
using YotsubaShader.Language;

namespace MyShaders;

public class Template
{
    [ShaderStage(Stage.Vertex)]
    public Pixel Vertex(Corner corner)
    {
        Pixel pixel;
        pixel.Position = Make.Vec4(corner.Position.X, corner.Position.Y, 0f, 1f);
        pixel.Uv = corner.Uv;
        return pixel;
    }

    [ShaderStage(Stage.Fragment)]
    [return: location(0)]
    public vec4 Fragment(PixelIn pixel)
    {
        return Make.Vec4(0f, 0f, 0f, 1f);
    }
}using YotsubaShader.HlslSyntax;
using YotsubaShader.GlslSyntax.Types;
using YotsubaShader.Language;
namespace MyShaders;
public class Template
{
[ShaderStage(Stage.Vertex)]
public Pixel Vertex(Corner corner)
{
Pixel pixel;
pixel.Position = Make.Vec4(corner.Position.X, corner.Position.Y, 0f, 1f);
pixel.Uv = corner.Uv;
return pixel;
}
[ShaderStage(Stage.Fragment)]
[return: SV_Target]
public vec4 Fragment(PixelIn pixel)
{
return Make.Vec4(0f, 0f, 0f, 1f);
}
}using YotsubaShader.MslSyntax;
using YotsubaShader.GlslSyntax.Types;
using YotsubaShader.Language;
namespace MyShaders;
public class Template
{
[ShaderStage(Stage.Vertex)]
public Pixel Vertex(Corner corner)
{
Pixel pixel;
pixel.Position = Make.Vec4(corner.Position.X, corner.Position.Y, 0f, 1f);
pixel.Uv = corner.Uv;
return pixel;
}
[ShaderStage(Stage.Fragment)]
[return: color(0)]
public vec4 Fragment(PixelIn pixel)
{
return Make.Vec4(0f, 0f, 0f, 1f);
}
}using YotsubaShader.WgslSyntax;
using YotsubaShader.GlslSyntax.Types;
using YotsubaShader.Language;
namespace MyShaders;
public class Template
{
[ShaderStage(Stage.Vertex)]
public Pixel Vertex(Corner corner)
{
Pixel pixel;
pixel.Position = Make.Vec4(corner.Position.X, corner.Position.Y, 0f, 1f);
pixel.Uv = corner.Uv;
return pixel;
}
[ShaderStage(Stage.Fragment)]
[return: location(0)]
public vec4 Fragment(PixelIn pixel)
{
return Make.Vec4(0f, 0f, 0f, 1f);
}
}using YotsubaShader.SpirvSyntax;
using YotsubaShader.GlslSyntax.Types;
using YotsubaShader.Language;
namespace MyShaders;
public class Template
{
[ShaderStage(Stage.Vertex)]
public Pixel Vertex(Corner corner)
{
Pixel pixel;
pixel.Position = Make.Vec4(corner.Position.X, corner.Position.Y, 0f, 1f);
pixel.Uv = corner.Uv;
return pixel;
}
[ShaderStage(Stage.Fragment)]
[return: Location(0)]
public vec4 Fragment(PixelIn pixel)
{
return Make.Vec4(0f, 0f, 0f, 1f);
}
}The Fragment of this template returns black (0, 0, 0). It is a shader that does nothing yet, ready for you to fill in.
When a chapter tells you "copy Template.cs as Colors.cs", do this:
- Copy the file and call it
Colors.cs. - Inside, change
public class Templatetopublic class Colors.
The class name has to match what you type after -- in the viewer.
Check that everything works by running the template. First add its line to the switch in Viewer/Program.cs, above the _ => line:
"Template" => new Template().ToKNIWebGL_FX(),Then run:
dotnet yotsuba add MyShaders/MyShaders.csproj --target spirv --target kni && dotnet run --project Viewer -- TemplateA completely black window should open. If you see it, you are ready.
If something fails#
| What you see | What it means | What to do |
|---|---|---|
The viewer does not know a shader called "Colors" | The name has no line in the viewer's switch, or you misspelled it. | Add "Colors" => new Colors().ToKNIWebGL_FX(), to the switch and check the capital letters. |
| The window shows the old shader | You changed the file but did not run add. | Use the cycle command, which does both things. |
error CS0234 when running add | You deleted or renamed a class and YotsubaShader.g.cs still names it. | Delete MyShaders/YotsubaShader.g.cs and run again. |
A CS error with a number and a line | It is an ordinary C# error in your code. | Read it, go to that line and fix it. add does not continue until it compiles. |
| The window does not open and there is no error | Sometimes it ends up behind other windows. | Look for it in the taskbar or the Dock. |
What you learned#
- To see a shader you need a window. The viewer is that window, and it is a separate tool: your shaders do not depend on it.
- The work cycle is: edit, compile with
add, and look with the viewer. Template.csis the mold for all the shaders to come: aVertexalready written and aFragmentthat returns black.
Next: The colors.