
Your window for seeing shaders
A small viewer that draws the shader you choose in a window, so you can see every change.
So far you have compiled a shader and read its code in the console. But a shader is made to be seen. A shader whose result you never see is like a recipe you never cook: you learn nothing from it.
That is why, from this chapter on, the way of working changes. Everything that follows works like this:
- You write a little code.
- You compile it.
- You look at it in a window.
- You change one number and look again.
For step 3 you need that window. You are going to build it now, just once.
What the viewer is#
The viewer is a small Godot scene that does three things:
- It draws a rectangle that covers the whole window (the same rectangle from Shader 1).
- It puts on it the shader you name.
- It hands it the window size and the time, in case the shader asks for them.
Notice one thing: the viewer is not part of your shader. Your shaders stay in MyShaders, knowing nothing about Godot. The viewer is just a work tool, like a bench for testing parts. When you want to take your shaders to your game, you will use the same library in your own scenes.
Step 1: create the Godot project#
Create an empty folder called GodotGame inside your Tutorial folder. Open Godot, press Create and fill in the window like this:
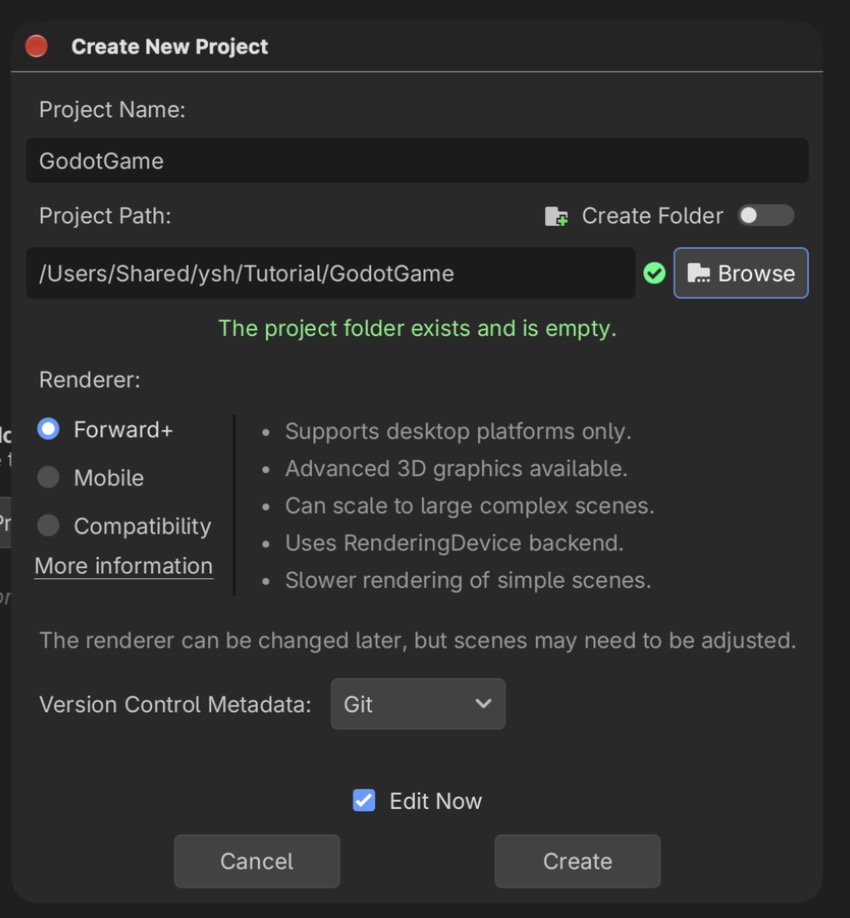
- Project Name:
GodotGame. - Project Path: the full path to that empty folder. Godot confirms it with "The project folder exists and is empty". Keep Create Folder off, because the folder already exists.
- Renderer: Forward+ is fine.
Press Create. The editor opens with an empty project:
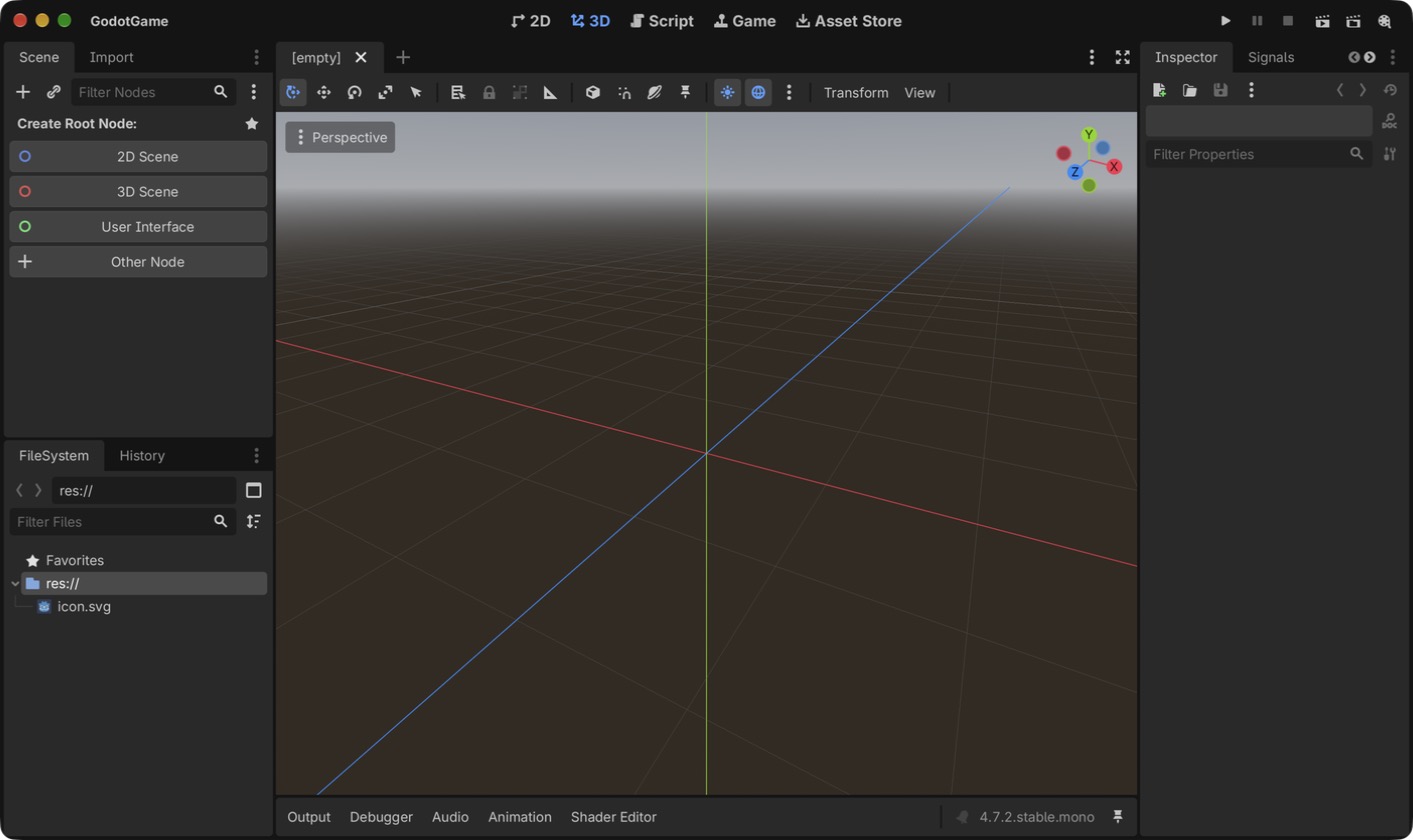
Tutorial/
├── MyShaders/        your shaders
├── TryIt/            the console from the previous chapter
└── GodotGame/        new: the Godot project
It goes inside Tutorial on purpose. The yotsuba tool was installed with a manifest (.config/dotnet-tools.json), and .NET looks for that manifest in the current folder and in the ones above. If the Godot project is inside Tutorial, dotnet yotsuba works from there too.
Step 2: install the addon#
Yotsuba Shader has an addon for the Godot editor. Every time you press Play, it asks yotsuba to translate your shaders into Godot files, so you never have to run the command by hand. The addon comes inside the NuGet package of the Godot plugin. From the Tutorial folder:
curl -L -o godot-addon.zip https://www.nuget.org/api/v2/package/YotsubaShader.Extensions.Godot/0.9.0
unzip -q godot-addon.zip "content/addon/addons/*" -d godot-addon
cp -R godot-addon/content/addon/addons GodotGame/
A .nupkg is a zip file, so on Windows you can also rename it to .zip and copy the addons/yotsubashader folder by hand.
Godot only looks at its files when it starts, so reload the project (Project → Reload Current Project). The new addons folder appears in the FileSystem panel.
Now turn the addon on. Open Project → Project Settings → Plugins. YotsubaShader is in the list, switched off:
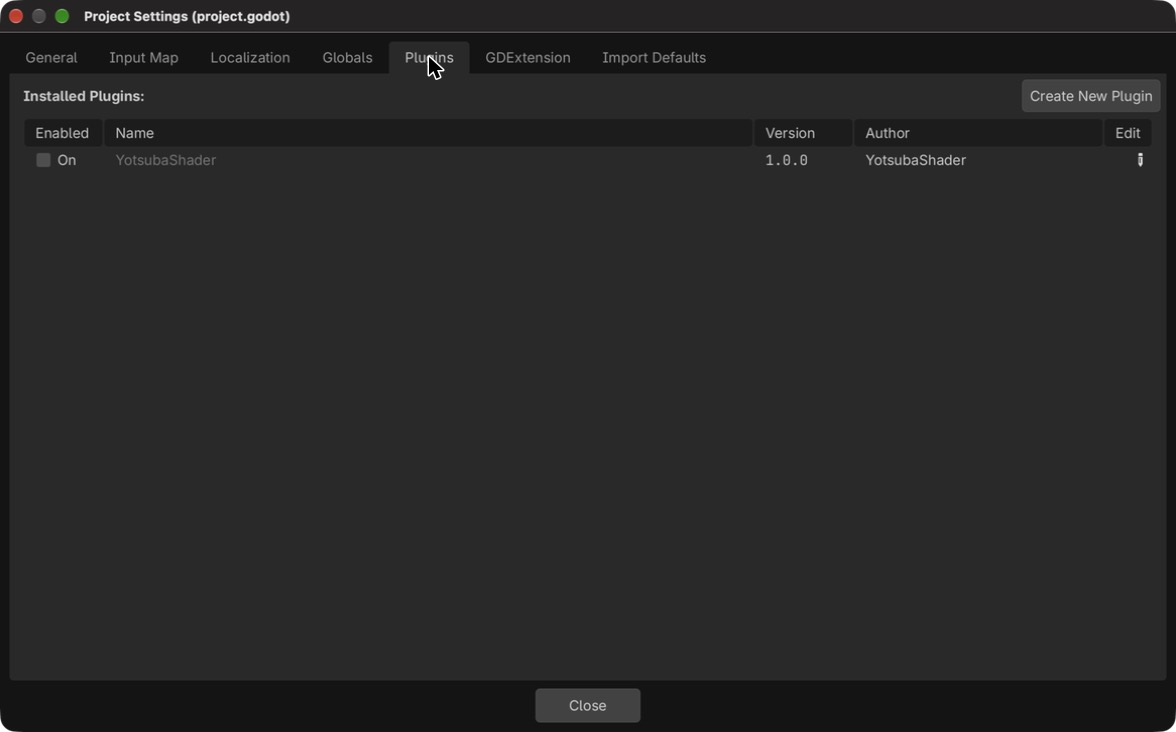
Tick the Enabled box. Then open the General tab, turn on Advanced Settings (top right), type yotsuba in the filter and choose the Yotsuba Shader section. The Project field is empty:
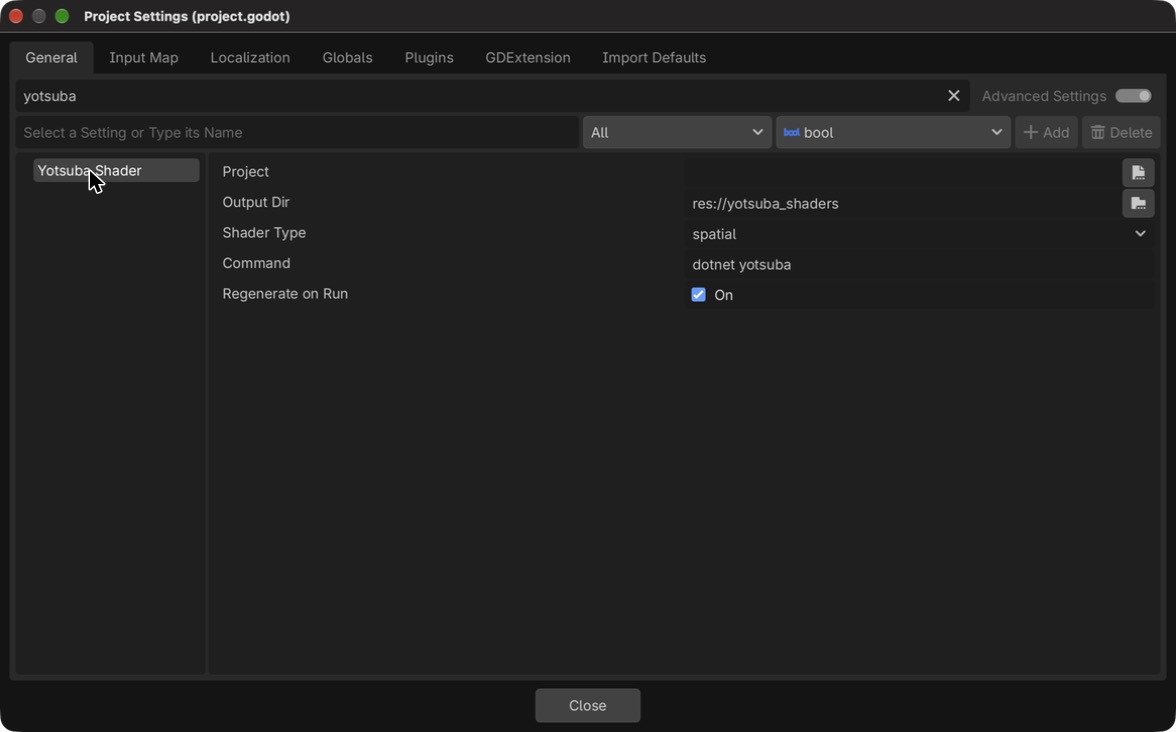
Fill in project with:
../MyShaders/MyShaders.csproj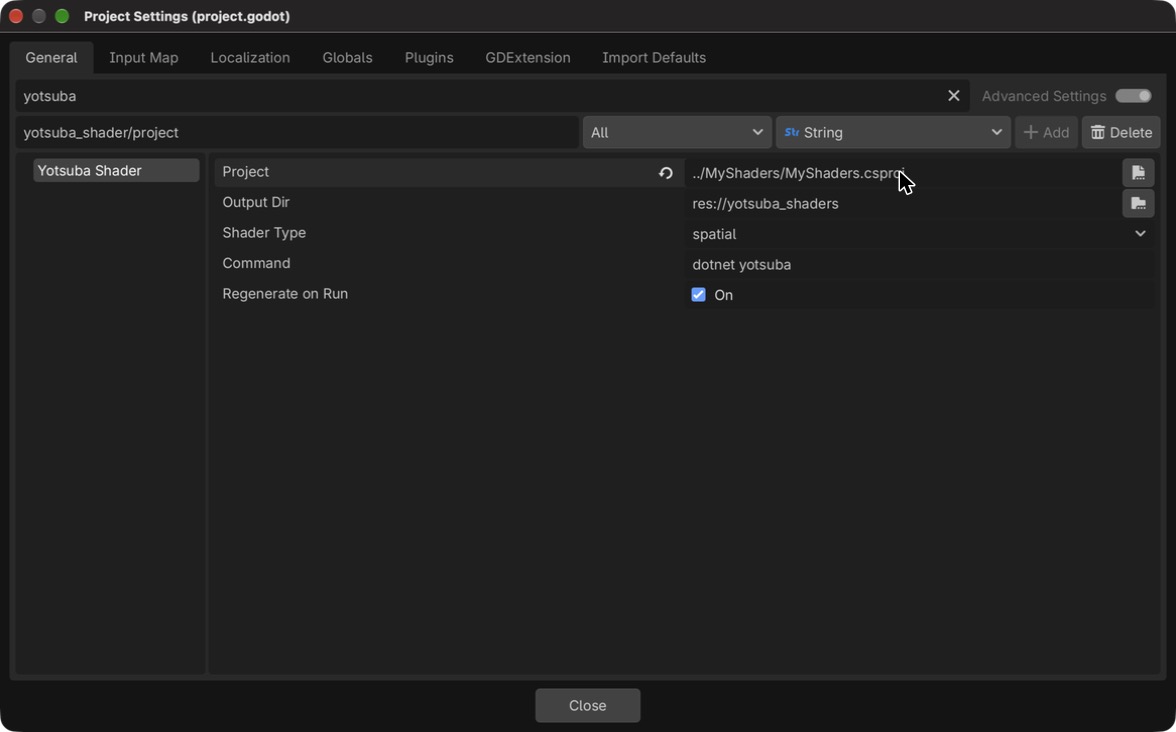
The path is counted from the Godot project. Leave the rest as it is: Output Dir is where the translated shaders go, Shader Type is spatial (for 3D objects), Command is the tool and Regenerate on Run makes the addon translate every time you press Play.
Step 3: the rectangle and the window#
Here is the key idea of this route: Godot does not draw a bare rectangle. It draws meshes, inside scenes. So the viewer is a scene with three nodes:
Viewer: the root. It carries the script.Screen: aMeshInstance3D, the object that will show your shader.Camera3D: without it Godot has nothing to look through.
Build it step by step.
The root. In the Scene panel, press 3D Scene. Godot creates a Node3D. Double-click its name and call it Viewer.
The Screen node. Right-click Viewer and choose Add Child Node… (or select it and press Cmd/Ctrl+A). Type MeshInstance3D, select it and press Create:
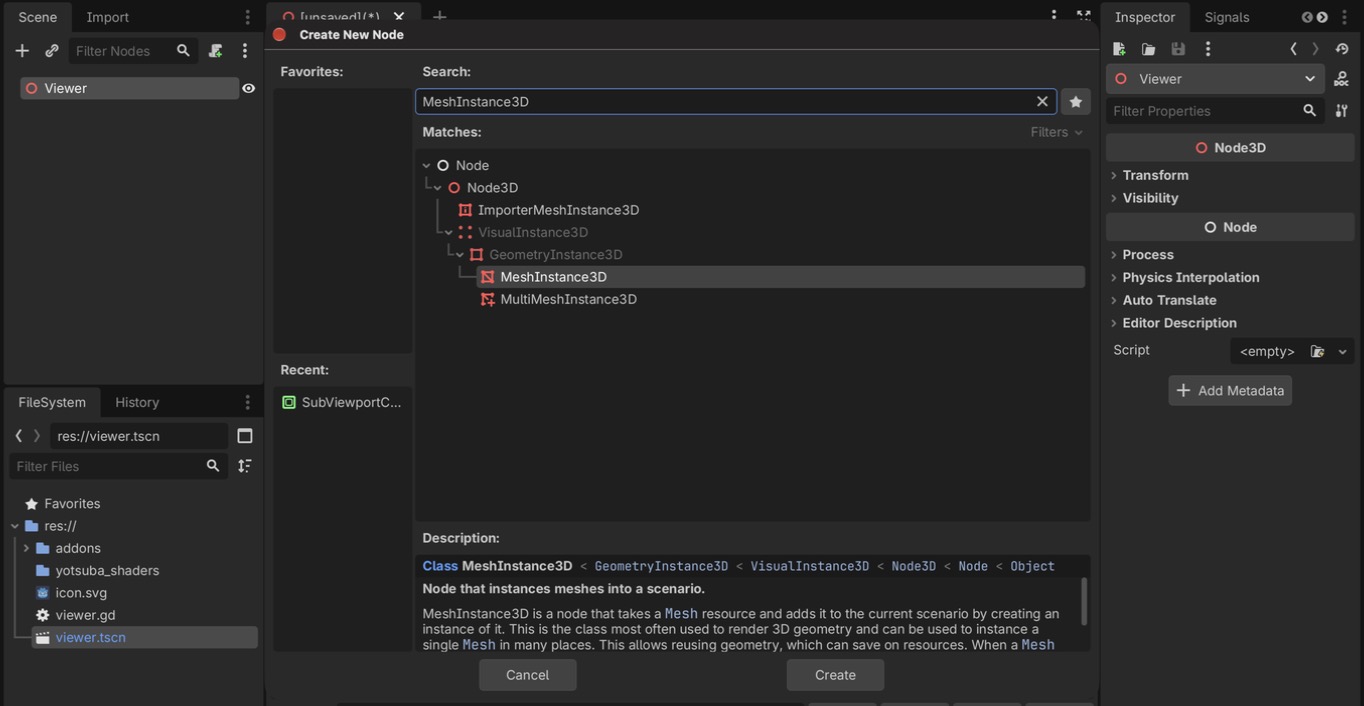
Double-click the new node and rename it to Screen.
The camera. Select Viewer again, add another child node, this time a Camera3D. Leave it as it is.
The margin. Select Screen. In the Inspector open Geometry and set Extra Cull Margin to 16384:
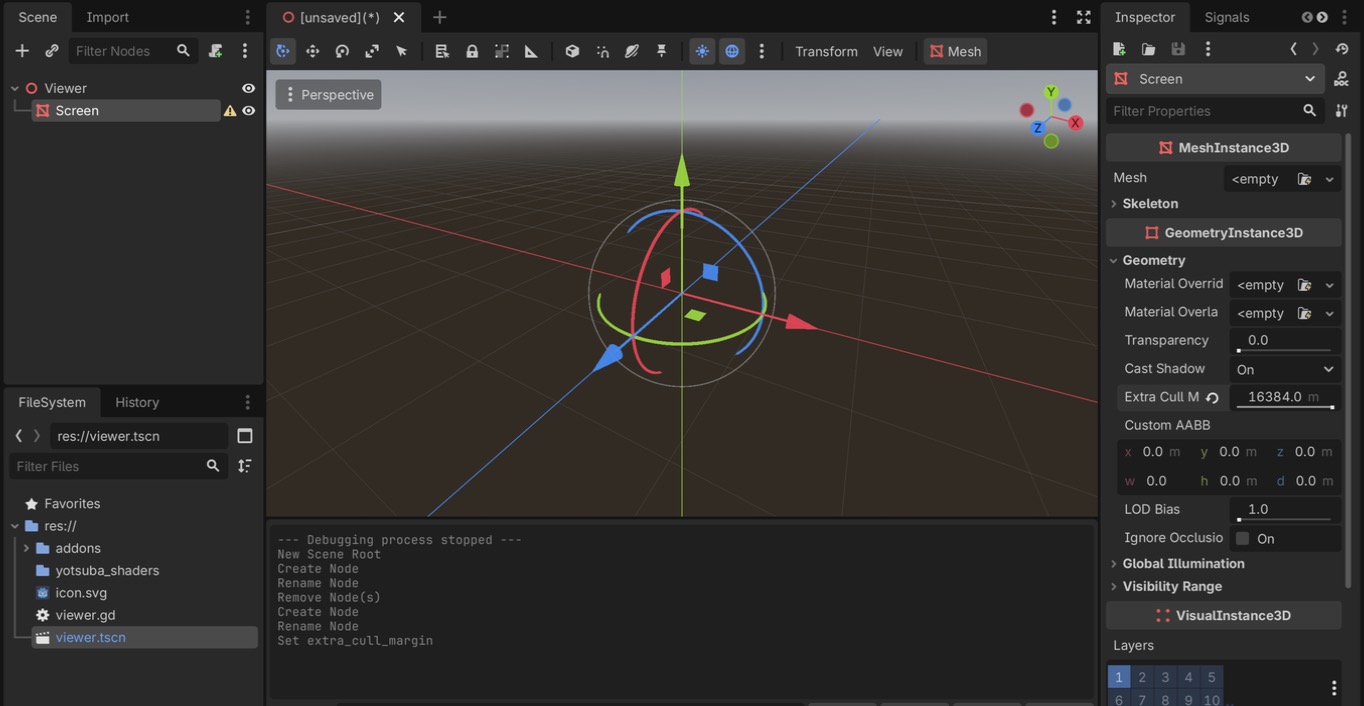
Why: before drawing an object, Godot checks, using its position in the 3D world, if it is inside what the camera sees. Your shader moves the vertices somewhere else, but that happens later. The big margin tells Godot: "do not throw this object away".
The script. Right-click Viewer and choose Attach Script…. Leave the language on GDScript (or choose C# if you use .NET), leave the path as res://viewer.gd and press Create:
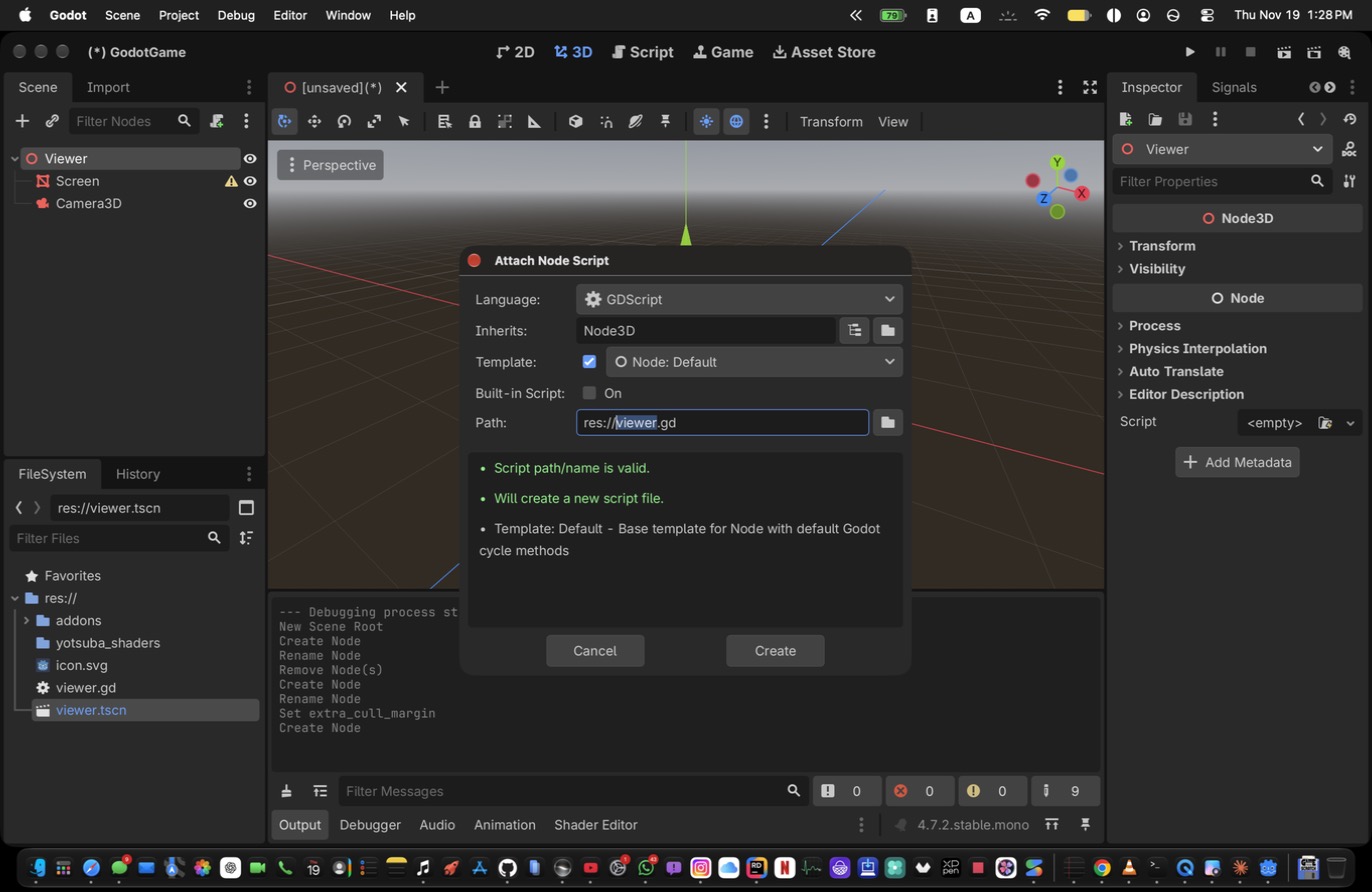
The script editor opens with a template. Replace all its content with this:
extends Node3D

## Name of the shader class in MyShaders (Gradient, Colors, Plasma...).
@export var shader_name := "Gradient"

## The image for shaders that declare a `Photo` texture. Drag one here in the Inspector.
@export var photo: Texture2D

var _material := ShaderMaterial.new()


func _ready() -> void:
	# The four corners of the rectangle, like the table from the chapter: position and Uv.
	var arrays := []
	arrays.resize(Mesh.ARRAY_MAX)
	arrays[Mesh.ARRAY_VERTEX] = PackedVector3Array([
		Vector3(-1, -1, 0), Vector3(1, -1, 0), Vector3(-1, 1, 0), Vector3(1, 1, 0)])
	arrays[Mesh.ARRAY_TEX_UV] = PackedVector2Array([
		Vector2(0, 0), Vector2(1, 0), Vector2(0, 1), Vector2(1, 1)])
	# Your struct asks for NORMAL and TANGENT, so the mesh has to carry them too.
	arrays[Mesh.ARRAY_NORMAL] = PackedVector3Array([
		Vector3(0, 0, 1), Vector3(0, 0, 1), Vector3(0, 0, 1), Vector3(0, 0, 1)])
	arrays[Mesh.ARRAY_TANGENT] = PackedFloat32Array([
		1, 0, 0, 1, 1, 0, 0, 1, 1, 0, 0, 1, 1, 0, 0, 1])
	var mesh := ArrayMesh.new()
	mesh.add_surface_from_arrays(Mesh.PRIMITIVE_TRIANGLE_STRIP, arrays)

	_material.shader = load("res://yotsuba_shaders/MyShaders/%s.spatial.gdshader" % shader_name)
	if photo:
		_material.set_shader_parameter("Photo", photo)
	$Screen.mesh = mesh
	$Screen.material_override = _material


func _process(_delta: float) -> void:
	var size := get_viewport().get_visible_rect().size
	var seconds := Time.get_ticks_msec() / 1000.0
	# Any uniform called <Field>_Width, <Field>_Height or <Field>_Seconds receives its value.
	for uniform in _material.shader.get_shader_uniform_list():
		var uniform_name: String = uniform.name
		if uniform_name.ends_with("_Width"):
			_material.set_shader_parameter(uniform_name, size.x)
		elif uniform_name.ends_with("_Height"):
			_material.set_shader_parameter(uniform_name, size.y)
		elif uniform_name.ends_with("_Seconds"):
_material.set_shader_parameter(uniform_name, seconds)using Godot;
public partial class Viewer : Node3D
{
// Name of the shader class in MyShaders (Gradient, Colors, Plasma...).
[Export] public string ShaderName { get; set; } = "Gradient";
// The image for shaders that declare a `Photo` texture. Drag one here in the Inspector.
[Export] public Texture2D Photo { get; set; }
private readonly ShaderMaterial _material = new();
public override void _Ready()
{
// The four corners of the rectangle, like the table from the chapter: position and Uv.
var arrays = new Godot.Collections.Array();
arrays.Resize((int)Mesh.ArrayType.Max);
arrays[(int)Mesh.ArrayType.Vertex] = new[]
{
new Vector3(-1, -1, 0), new Vector3(1, -1, 0), new Vector3(-1, 1, 0), new Vector3(1, 1, 0),
};
arrays[(int)Mesh.ArrayType.TexUV] = new[]
{
new Vector2(0, 0), new Vector2(1, 0), new Vector2(0, 1), new Vector2(1, 1),
};
// Your struct asks for NORMAL and TANGENT, so the mesh has to carry them too.
arrays[(int)Mesh.ArrayType.Normal] = new[]
{
new Vector3(0, 0, 1), new Vector3(0, 0, 1), new Vector3(0, 0, 1), new Vector3(0, 0, 1),
};
arrays[(int)Mesh.ArrayType.Tangent] = new float[] { 1, 0, 0, 1, 1, 0, 0, 1, 1, 0, 0, 1, 1, 0, 0, 1 };
var mesh = new ArrayMesh();
mesh.AddSurfaceFromArrays(Mesh.PrimitiveType.TriangleStrip, arrays);
_material.Shader = GD.Load<Shader>($"res://yotsuba_shaders/MyShaders/{ShaderName}.spatial.gdshader");
if (Photo != null) _material.SetShaderParameter("Photo", Photo);
var screen = GetNode<MeshInstance3D>("Screen");
screen.Mesh = mesh;
screen.MaterialOverride = _material;
}
public override void _Process(double delta)
{
Vector2 size = GetViewport().GetVisibleRect().Size;
double seconds = Time.GetTicksMsec() / 1000.0;
// Any uniform called <Field>_Width, <Field>_Height or <Field>_Seconds receives its value.
foreach (var uniform in _material.Shader.GetShaderUniformList())
{
string name = uniform["name"].AsString();
if (name.EndsWith("_Width")) _material.SetShaderParameter(name, size.X);
else if (name.EndsWith("_Height")) _material.SetShaderParameter(name, size.Y);
else if (name.EndsWith("_Seconds")) _material.SetShaderParameter(name, seconds);
}
}
}The corners are the same table of the previous chapters: each one says where it is and what its Uv is. One thing changes in Godot: the vertical axis of the screen goes the other way (Y = -1 is the top), so the corner that has Uv = (0, 0) is written with Y = -1. This way the Uv still starts at the top left, and the shaders look the same as in every other route.
Other lines worth reading:
ShaderMaterialis a material whose painting is done by a shader you provide.material_overridemakesScreenuse it._ready()runs once, when the scene starts._process()runs every frame.- The loop in
_processlooks at theuniformof your shader and sends a value to the ones whose name ends in_Width,_Heightor_Seconds(for exampleData_SecondsorTime_Seconds). If your shader declares none of them, nothing happens. You will learn what they are for in a few chapters. @export(or[Export]in C#) putsshader_namein the Inspector, so you choose the shader without touching the code.
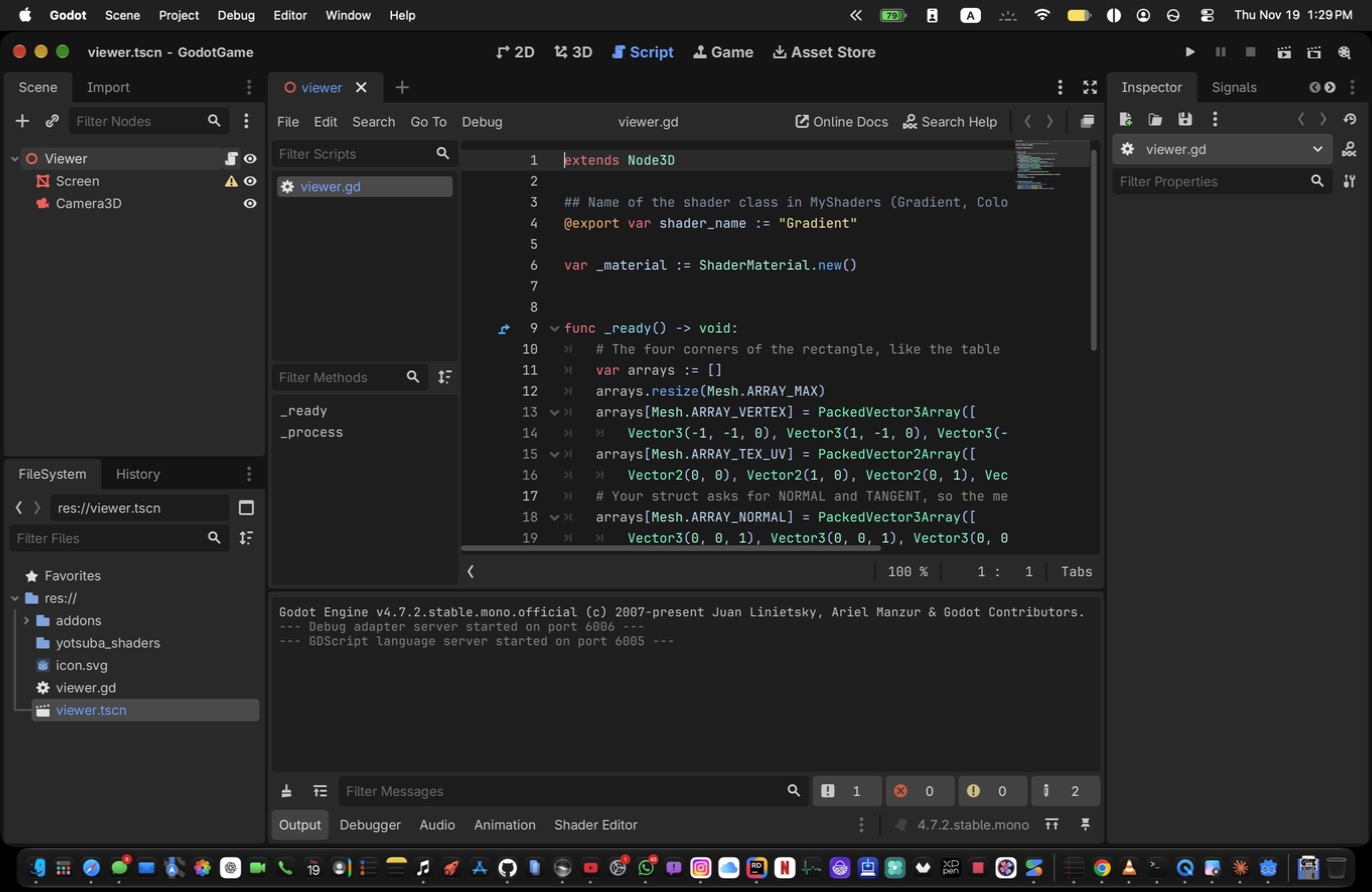
This is how the editor looks with your script:
If you use C#, the script file must be called exactly like the class, Viewer.cs, and Godot needs a .csproj for the Godot project (the editor makes it with Project → Tools → C# → Create C# solution). That .csproj is not MyShaders: it is the one of the game.
Step 4: see your first shader#
Save the scene (Cmd/Ctrl+S) with the name viewer.tscn. Select the Viewer node: in the Inspector, Shader Name says Gradient.
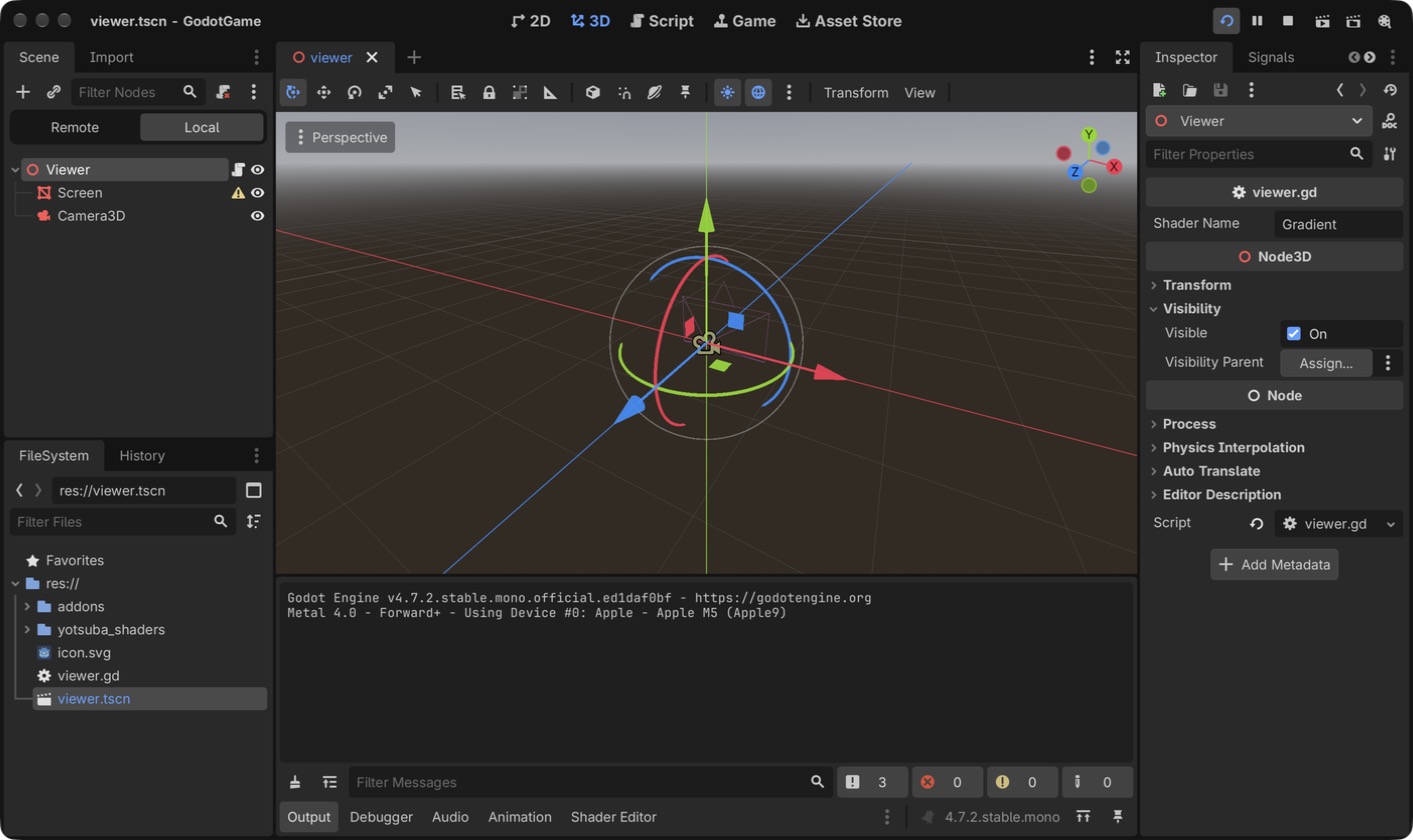
Press Play (the triangle at the top right). The first time, Godot asks for a main scene: choose Select Current. Before the game starts, the addon translates MyShaders, and then the window opens.
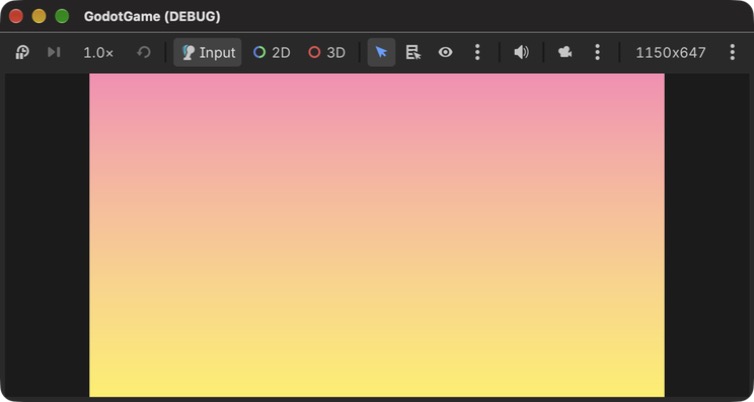
That is your shader, drawn by the GPU. Close the window to go back to the editor.
The work cycle#
For the rest of the tutorial you will use this cycle:
- You edit a file in
MyShaders. - You press Play in Godot. The addon compiles for you.
- You look at the window.
Try it with your first experiment. Open MyShaders/Gradient.cs and find this line in Fragment:
float red = 1f;Change it to this:
float red = pixel.Uv.X;Save and press Play:
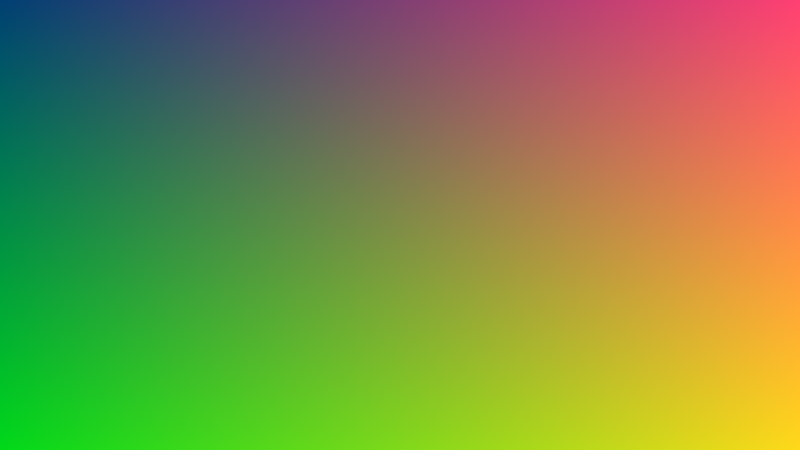
Red no longer has the same value across the whole screen: now it grows from left to right, because pixel.Uv.X goes from 0 at the left edge to 1 at the right.
You have just done what you will do hundreds of times: change a number and see what happens. Before moving on, put the line back to float red = 1f;.
A starting file#
For each of the following chapters you will create a new shader. They all start the same way, with the same Vertex as always, so it is handy to have it as a mold. Create MyShaders/Template.cs:
using YotsubaShader.GlslSyntax;
using YotsubaShader.GlslSyntax.Types;
using YotsubaShader.Language;

namespace MyShaders;

public class Template
{
    [ShaderStage(Stage.Vertex)]
    public Pixel Vertex(GodotVertex corner)
    {
        Pixel pixel;
        pixel.Position = Make.Vec4(corner.VERTEX.X, corner.VERTEX.Y, 0f, 1f);
        pixel.Uv = corner.UV;
        return pixel;
    }

    [ShaderStage(Stage.Fragment)]
    [return: location(0)]
    public vec4 Fragment(PixelIn pixel)
    {
        return Make.Vec4(0f, 0f, 0f, 1f);
    }
}using YotsubaShader.HlslSyntax;
using YotsubaShader.GlslSyntax.Types;
using YotsubaShader.Language;
namespace MyShaders;
public class Template
{
[ShaderStage(Stage.Vertex)]
public Pixel Vertex(GodotVertex corner)
{
Pixel pixel;
pixel.Position = Make.Vec4(corner.VERTEX.X, corner.VERTEX.Y, 0f, 1f);
pixel.Uv = corner.UV;
return pixel;
}
[ShaderStage(Stage.Fragment)]
[return: SV_Target]
public vec4 Fragment(PixelIn pixel)
{
return Make.Vec4(0f, 0f, 0f, 1f);
}
}using YotsubaShader.MslSyntax;
using YotsubaShader.GlslSyntax.Types;
using YotsubaShader.Language;
namespace MyShaders;
public class Template
{
[ShaderStage(Stage.Vertex)]
public Pixel Vertex(GodotVertex corner)
{
Pixel pixel;
pixel.Position = Make.Vec4(corner.VERTEX.X, corner.VERTEX.Y, 0f, 1f);
pixel.Uv = corner.UV;
return pixel;
}
[ShaderStage(Stage.Fragment)]
[return: color(0)]
public vec4 Fragment(PixelIn pixel)
{
return Make.Vec4(0f, 0f, 0f, 1f);
}
}using YotsubaShader.WgslSyntax;
using YotsubaShader.GlslSyntax.Types;
using YotsubaShader.Language;
namespace MyShaders;
public class Template
{
[ShaderStage(Stage.Vertex)]
public Pixel Vertex(GodotVertex corner)
{
Pixel pixel;
pixel.Position = Make.Vec4(corner.VERTEX.X, corner.VERTEX.Y, 0f, 1f);
pixel.Uv = corner.UV;
return pixel;
}
[ShaderStage(Stage.Fragment)]
[return: location(0)]
public vec4 Fragment(PixelIn pixel)
{
return Make.Vec4(0f, 0f, 0f, 1f);
}
}using YotsubaShader.SpirvSyntax;
using YotsubaShader.GlslSyntax.Types;
using YotsubaShader.Language;
namespace MyShaders;
public class Template
{
[ShaderStage(Stage.Vertex)]
public Pixel Vertex(GodotVertex corner)
{
Pixel pixel;
pixel.Position = Make.Vec4(corner.VERTEX.X, corner.VERTEX.Y, 0f, 1f);
pixel.Uv = corner.UV;
return pixel;
}
[ShaderStage(Stage.Fragment)]
[return: Location(0)]
public vec4 Fragment(PixelIn pixel)
{
return Make.Vec4(0f, 0f, 0f, 1f);
}
}The Fragment of this template returns black (0, 0, 0). It is a shader that does nothing yet, ready for you to fill in.
When a chapter tells you "copy Template.cs as Colors.cs", do this:
- Copy the file and call it
Colors.cs. - Inside, change
public class Templatetopublic class Colors.
The class name has to match what you type after -- in the viewer.
Check that everything works by running the template. Select the Viewer node, write Template in Shader Name and press Play. A completely black window should open. If you see it, you are ready.
If something fails#
| What you see | What it means | What to do |
|---|---|---|
Cannot open file 'res://yotsuba_shaders/MyShaders/Colors.spatial.gdshader' | The name in Shader Name is misspelled, or the addon did not run. | Check the capital letters, and that the YotsubaShader plugin is on. |
| The window shows the old shader | The addon is off or regenerate_on_run is off. | Turn it on in the Project Settings, or use Project → Tools → Regenerate YotsubaShader shaders. |
The Output panel says dotnet was not found | Godot, opened from the Dock or Finder, does not see the same PATH as your terminal. | Put the full path of dotnet in the command setting of the addon. |
dotnet yotsuba says it does not exist | The Godot project is outside the folder where you ran dotnet new tool-manifest. | Move GodotGame inside Tutorial. |
A CS error with a number and a line | It is an ordinary C# error in your shader. | Read it, go to that line and fix it. |
| The window is black or empty | Godot threw the rectangle away or the shader failed. | Check extra_cull_margin of Screen and the Output panel. |
What you learned#
- To see a shader you need a window. The viewer is that window, and it is a separate tool: your shaders do not depend on it.
- The work cycle is: edit, compile with
add, and look with the viewer. Template.csis the mold for all the shaders to come: aVertexalready written and aFragmentthat returns black.
Next: The colors.